
How to Start a Clothing Line: A Complete 2026 Guide


Starting a clothing line sounds like a big undertaking. And honestly? Depending on the business model and path you choose, it can be.
That's because many first-timers who jump into it typically overlook the fundamentals and go straight to production without having the right know-how.
They'll spend months designing something nobody asked for, blow their budget on inventory that doesn't move, and then quietly shut down before their second drop. But here's what those people got wrong:
It wasn't the idea that failed them. It was the execution.
The truth is, independent clothing lines are thriving thanks to the rise of Creator commerce, which has provided the accessibility and tools online to design, manufacture, and build your own clothing collection.
According to Grand View Research, the global print-on-demand market alone is estimated to be valued at $13.06 billion by this year, with projections to reach $57.49 billion by 2033. Apparel is its single largest category. So the demand is real. The question is whether you know how to reach it.

That's exactly what this guide covers. And to ground it in reality, here's what's actually happening across thousands of independent clothing brands on Fourthwall right now, based on real platform data from the past 12 months:
Here's a quick overview of our co:
- Apparel represents 77.5% of total merchandise GMV (Gross Merchandise Value, or the total value of products sold) on Fourthwall, making it the platform's most popular product category by far.
- T-shirts are the clear bestseller, representing 42.9% of all items sold and nearly 68% of all apparel units, proving they're still the easiest and most popular product to launch with.
- The average apparel item sells for $30.42, while the average order value across the platform is $54.52, showing that customers frequently purchase multiple products per order.
- Black remains the dominant apparel color choice, accounting for 43% of all apparel sold, while black and white together make up more than half of all apparel purchases on the platform.
- Creators on Fourthwall keep 100% of their markup on physical products, with no monthly fees and no platform commission on merchandise sales.
You do not need a massive following. You do not need a warehouse. You do not need to spend $10,000 before your first sale. What you need is a clear plan and the willingness to follow it through.
This guide will give you both.
Key Takeaways
- Choosing the right products and niche up front saves months of wasted effort and thousands of dollars in production errors.
- Deciding on a business model, whether it's print-on-demand, wholesale/private label, or custom cut and sew, determines your overall cost, timeline, and creative control.
- A strong brand identity built around a defined market, clear pillars, and consistent visuals is what separates clothing businesses that survive from the ones that don't.
- Our nine-step process that takes you from concept to launch in a logical sequence that will help anyone start their clothing line with confidence.
- Pricing, packaging, and post-sale marketing are where most first-time brands leave money on the table.
Deciding on What Clothing Products to Sell

There are many options when it comes to creating your own apparel and fashion products.
If you've always wanted to start a clothing line, you likely already have a good idea of the types of products you want to create and sell. For others, the opportunity to start a brand represents a chance to design something that reflects their personal style.
Regardless of which category you fall into, it's important to carefully consider your options before committing to any of them. Each product type presents its own set of opportunities and challenges for manufacturing, pricing, sizing, and building a brand around it.
Some of the most popular clothing and apparel products for independent brands include:
- T-Shirts: The most popular and lowest-risk entry point for any new brand or designer. t-shirts represent about 43% of every item sold on Fourthwall and roughly two-thirds of all apparel units.
- Long-Sleeve Shirts: Slightly more seasonal, but strong performers in colder demographics. Long-sleeve shirts average about $31 on Fourthwall, and provide your customers with a more premium option over a basic tees.
- Hoodies and Sweatshirts: Higher price points, higher perceived value, and consistently among the top-selling items for independent brands. Hoodies sell for about 72% more per unit than t-shirts on Fourthwall ($44 vs. $26).
- Pants and Leggings: A more complex product to execute well, but high loyalty once you find the right fit and customer. Fourthwall currently offers over 25 bottoms options, including joggers, leggings, sweatpants, shorts, and wide-leg styles, with the majority using sublimation or all-over print for full-coverage designs.
- Dresses: A saturated but passionate market with strong repeat purchase rates. All dress styles on Fourthwall use sublimation printing for full-coverage custom designs, and the T-Shirt Dress in particular runs from 2XS to 6XL, making it one of the widest size ranges on the entire platform.
- Lingerie, Underwear, and Socks: High-volume, high-frequency repurchase products with strong potential for niche positioning. Socks in particular have one of the lowest entry costs on Fourthwall with crew socks starting at just $9.95, making them one of the easiest products to test with minimal upfront risk.
Each of these products presents its own opportunities and trade-offs when it comes to building a clothing brand around it.
For instance, a hoodie brand and a sock brand are fundamentally different businesses due to their difference in manufacturing partners, price ranges, and customer expectations.
The right starting point isn't necessarily the product you're most excited about. It's the product that best fits your audience, your budget, and your ability to deliver consistent quality.
Keep that tension in mind as you continue through this guide.
Choosing the Right Business Model for Your Clothing Line
Before you start designing anything, you need to understand the business underneath the brand.
There are three primary models for starting a clothing line, and they differ dramatically in cost, complexity, timeline, and the level of creative control they give you.
Choosing the wrong one for your current stage is one of the most common (and most expensive) mistakes new clothing brands make.
Here's a quick comparison before we dig in:
Print-on-Demand Business Model

Print-on-demand (POD) is the lowest-barrier entry point into the clothing business.
When a customer places an order, your POD platform prints the item and ships it directly to them. You never hold inventory, you never pay for product upfront, and you can launch with as little as $0 in production costs.
The process works through direct-to-garment (DTG) digital printing: a high-accuracy inkjet method that applies full-color designs directly onto fabric.
And because there are no setup costs or minimum order quantities, it's cost-effective even for single-unit orders.
There are plenty of ways to produce and sell custom apparel today. Many entrepreneurs choose Shopify and connect third-party print-on-demand providers to handle printing and fulfillment.
While this approach offers flexibility, it also means juggling multiple platforms and often managing responsibilities like customer support and sales tax compliance yourself.
Fourthwall takes a different approach. Built specifically for independent brands, it combines your storefront, product catalog, printing, fulfillment, and ecommerce tools into one platform.
You get access to hundreds of premium print-on-demand products, while Fourthwall handles order fulfillment, customer support, and sales tax as the merchant of record. That means less time managing backend operations and more time designing products, growing your audience, and building your brand.
Pros
- No upfront inventory costs
- Launch with little to no startup budget
- No minimum order requirements
- Orders are printed and shipped automatically
- Easy to test new designs with minimal risk
- Access to hundreds of apparel and merchandise products
Cons
- Limited customization compared to cut-and-sew production
- Custom packaging and branding options may vary by supplier
- Quality can differ between product blanks and print providers
- Harder to negotiate volume discounts as sales grow
Wholesale/Private Label Business Model

With this model, you purchase clothing from a manufacturer or wholesale supplier at a bulk discount and sell it under your own brand.
Private label takes it a step further. You work with a supplier who lets you apply your own branding (custom labels, hangtags, packaging) to their products.
You're not manufacturing garments from scratch, which keeps costs below those of custom cut-and-sew. But you are buying inventory upfront, which means making educated guesses about what will sell before you've sold anything.
Minimum order quantities (MOQs) typically start at 50–100 units per SKU (size and color combination), so your capital spreads across a lot of product quickly.
This model works if you're ready to commit to quantities but aren't ready (financially or operationally) for full custom manufacturing.
Pros
- No need to manufacture garments from scratch
- Easier to launch a clothing brand with established products
- Can react to trends faster than custom manufacturing
- Ability to curate your own collection of apparel
- Volume discounts lower your cost per item
- Potential for higher profit margins than print-on-demand
- Custom branding options like hangtags, labels, and packaging
Cons
- Requires purchasing inventory upfront
- Minimum order quantities can range from dozens to hundreds of units
- You'll need to predict demand before making sales
- Responsible for storing, managing, and tracking inventory
- You'll need to handle shipping and fulfillment yourself (or hire a fulfillment partner)
Cut & Sew Business Model

Custom cut-and-sew is the full brand model. You design garments from scratch, like your silhouettes, fabrics, construction details, and finishing, then work with a pattern maker to create production-ready files, and contract a manufacturer for a full production run.
Everything is yours. The fit, the material, and the label.
Going with this model allows you to produce genuinely distinctive products at premium prices. It's also the most expensive, time-consuming, and most complex path to market.
Getting to a finished sample alone can cost $2,000–$5,000, with a full production run typically starting at $10,000 and scaling from there.
The timeline from concept to shelf is measured in months, not weeks. And before a single customer sees your product, you've already committed to quantities and colorways that can't be changed.
Pros
- Create a completely custom product from the ground up
- Full control over fabrics, fit, construction, and materials
- Unique designs that competitors can't easily replicate
- Greater creative freedom than wholesale or print-on-demand
- Potential for premium pricing and higher profit margins
- Complete control over labels, tags, packaging, and branding
Cons
- Very high startup and production costs
- Pattern development and sampling can be expensive
- Production timelines can take months or longer
- Mistakes during development can be costly to fix
- Requires forecasting demand before production begins
How to Develop a Brand for Your Clothing Line
Let's be real, a product without a brand is just a garment.
Sure, you can slap the same design on all your items to give your clothes some consistency. But if you don't have a story or, at very least, an identity that ties into your products, you'll most likely just get one-time buyers who don't feel connected to your clothes.
That's why it's important, before you design a single piece, to build a foundation on which everything else sits. Here's what you need to know when creating a brand for your clothing line that identifies with you.
Defining Your Market
Defining your market is important for any brand, but it's especially critical in clothing because the industry is one of the most saturated on earth.
Broadly targeting large groups of people, "anyone who likes hoodies" or "people who want funny shirts," leaves you with a brand that speaks to no one specifically, and therefore connects with very few people meaningfully.
What you want to do is niche down and create clear segments. Ask yourself:
- What type of clothing and apparel do I want to make?
- Who is going to purchase my products?
- What value will my brand bring to these people that nothing else currently does?
- What will be unique about what I offer?
- Who are my real competitors, and how do they currently serve (or underserve) this audience?
The better you understand who your customers are and what makes your brand different, the easier it becomes to market your products to the right audience, rather than wasting time and money trying to reach people who aren't interested.
For example, "Clothing with funny slogans" is too broad to build a brand around. But "clothing with slogans specifically for emergency room nurses" is a niche that's specific, underserved, deeply passionate, and built-in for community marketing.
The smaller the pool, the more loyal the people in it.
Creating Your Brand Pillars
Brand pillars are three to four keywords or attributes that define what your brand is fundamentally about.
They serve as the starting point for your brand persona and act as a consistent checkpoint against everything you do. These consist of your designs, your website, your ads, your social media content, and even the way you talk to customers.
Before creating anything, ask yourself: Do these words represent the essence of what I'm building?
A streetwear brand built for skaters might have pillars like Raw. Unfiltered. Community. Movement. A premium sustainable brand might anchor to: Considered. Lasting. Responsible. Beautiful. A Creator merch brand might center on: Authentic. Inside. Playful. Yours.
Your brand pillars aren't necessarily marketing language. They're internal guardrails that keep every decision consistent with the identity you're trying to build.
Developing Your Brand Visuals
Your brand visuals are what people see before they read a word. They include your logo, your color palette, your typography, and your overall design and photography aesthetic. Together, they create the impression of your brand before any product is even shown.
- Create a Moodboard First: A moodboard is a collection of images, colors, design references, photography styles, and any other visual material that captures the feeling you're building toward. Pinterest and Instagram are the most practical tools for this.
- Select a Color Palette: Your palette should emerge naturally from your moodboard. Pay attention to the colors that keep appearing; those are the ones your eye is drawn to, and they'll likely resonate with your audience for the same reasons. Tools like Adobe Color can help you explore complementary palettes and refine your selection.
- Design Your Logo: Your logo should represent your brand clearly and speak to your demographic. For brands with real budgets, a professional logo designer is worth the investment. For those just starting out, tools like Looka provide AI-assisted logo creation at a fraction of the cost of a designer.
Once your visuals are established, consistency is everything. Apply them uniformly across your storefront, your packaging, your social media, and your marketing materials.
Consistency is what transforms individual design decisions into a recognizable brand identity.
How to Build Your Clothing Line in 9 Steps
Most people who decide to start a clothing brand skip straight to designing.
Then they spend weeks building something that either can't be manufactured within their budget, doesn't connect with any specific customer, or costs more to produce than they can realistically charge for it.
The nine steps below are sequenced the way they're sequenced for a reason.
Each one builds directly on the last. Work through them in order, and you'll avoid the most common mistakes that quietly end clothing businesses before they ever get traction.
Step 1: Pick a Niche and Choose Your Products
Selecting a solid niche is where your clothing brand actually begins. Not the logo, not the design, and certainly not the product.
Your niche acts as a specific intersection for your audience, aesthetic, and purpose, making your brand mean something to someone in particular.
The brands that carve out real space aren't the ones that try to serve everyone. They're the ones that decided exactly who they were for and built everything around that person.
Here are five of the most viable niches for independent clothing brands in 2026, along with what makes each one work:
Streetwear

Streetwear is one of the most developed niches in independent clothing. It’s also one of the hardest to break into without a strong point of differentiation.
It's rooted in youth culture and urban aesthetics, drawing a lot of influence from music, skateboarding, and art. The brands that succeed here aren't just selling clothes; they're selling cultural credibility.
To compete in streetwear, you need a design identity that feels authentic to the culture and not just an outsider's interpretation of it.
Athleisure Wear

Athleisure is all about performance wear and everyday fashion. It's clothing designed to move through a workout and a workday without changing.
It's also one of the fastest-growing segments in apparel, thanks in part to the post-pandemic normalization of comfortable, laid-back clothing in non-gym settings.
When it comes to creating your own athleisure wear line, it's best to narrow down within your niche rather than competing head-on with established brands.
For example, instead of "athletic wear," think "performance wear for rock climbers" or "minimalist gym basics for women who train early." The more specific your customer, the more clearly you can design for their actual needs.
Creator Merch/Internet Culture

This is the fastest-growing segment for independent clothing brands right now, and it's being driven entirely by the Creator economy.
Creators on YouTube, Twitch, TikTok, and podcasting platforms are building their own merch collections around their content, and clothing such as t-shirts, hoodies, and hats are among the most popular items.
These items feature designs that feel like they were made specifically for a particular community, because they are riddled with catchphrases, inside jokes, logos, or artwork related to the creator or their brand.
Fourthwall was built specifically for this model, with zero platform fees on physical products, native integrations with YouTube, TikTok, and Instagram Shopping, and tools designed to help Creators sell directly to the people who already trust them.
Premium/Elevated Basics

Premium basics occupy the space between fast fashion and luxury. They're thoughtfully designed pieces that justify a higher price point through material quality, fit, and longevity rather than trend.
This niche is well-suited to brands willing to invest in the product itself rather than the marketing.
The key to launching a successful premium brand is fabric selection, fit, and being honest about your brand, because customers buying premium basics understand the material and won't be bothered with your product if it doesn't deliver what it promises.
Sustainable Fashion

Sustainability is no longer a niche within fashion; it's an expectation that's increasingly demanded at every price point.
The opportunity for independent brands isn't to be "a sustainable brand" generically, but to build sustainability into the core of a specific product category and communicate that story with specificity and proof.
Globally, consumers are willing to pay an average of 9.7% more for eco-friendly products, and the sustainable clothing segment is projected to grow from $8.6 billion to $39 billion by 2035.
The brands that win here will be the ones that go beyond using organic cotton as a selling point and instead build their entire operation (materials sourcing, manufacturing relationships, packaging, returns) around environmental accountability.
Step 2: Create Concepts of Your Designs
Great clothing design isn't about complexity.
Some of the best-selling independent apparel is remarkably simple. What it's never is generic. Here's the difference.
Design for a Specific Customer, Not a Hypothetical One
The clearest signal that a design won't sell is that it could appeal to anyone.
Designs that make a specific person feel seen, like a reference only they would understand or something that speaks to their visual language, sell, while designs optimized for universal appeal reach no one.
Your starting point should always be your niche and the visual culture around it. Study the imagery, typography, color, and references that already resonate with your target community.
Fashion magazines like Vogue and GQ can surface broader trend directions, but the most useful research happens on the social platforms and communities where your specific audience actually lives.
High Contrast and Readability are Non-Negotiable
Apparel exists in the real world, not on a mockup screen.
Your design needs to read clearly from across a room, at thumbnail size on Instagram, and on a moving human body.
Bold outlines and high contrast hold up across all of those conditions. Designs with too much fine detail tend to look compelling as a digital file and muddy in print.
Limit Your Color Palette
Going with three to five colors for your design can produce cleaner, more brand-consistent results than full-color artwork for most independent labels.
It also reduces your printing costs significantly if you move toward screen printing at volume.
Build a Visual System, Not One-Off Pieces
A collection of eight products in one cohesive aesthetic will outsell eight products in eight different styles every single time.
The style is what people recognize and come back for. The individual piece is just the entry point into that world.
Design tools to get the job done:
- Procreate (iPad): The gold standard for hand-drawn illustration.
- Adobe Illustrator: Industry-standard vector software. Required for most professional print files.
- Canva: Excellent for beginners and text-driven, graphic-heavy designs.
- Figma: Strong vector control for designers comfortable with the interface.
- Kittl: AI tool with strong template libraries popular with independent merch Creators.
- Fourthwall: Built-in design editor that lets you edit or create new artwork.
What If You Can't Draw?
You don't need to be an illustrator to build a clothing brand. Many successful independent labels are run by people with strong taste and zero drawing ability. Your realistic options:
- Hire a Freelance Illustrator through Fiverr, Behance, or Dribbble. Budget $100-$400 per design for quality work.
- Use Fourthwall's Design Community, a vetted network of artists who work specifically with Creators on merch projects and understand production file requirements.
- Collaborate with an Artist who has the skills but lacks your audience. A revenue share arrangement can benefit both sides significantly.
Step 3: Test Out Your Designs Online
Before you spend a dollar on production, find out whether people actually want what you're making. This step is where the most expensive mistakes in clothing are prevented, and most guides skip it entirely.
Post Your Concepts and Ask the Right Questions
Social media can be a great outlet for sharing rough sketches or basic mockups of your clothing designs, since you already have a dedicated audience you can trust to give you honest feedback.
But instead of asking the typical "Do you like this?" Consider asking "Would you buy this?" or "Would you wear this out?"
This is because people often say they like an idea simply to be supportive, whereas questions about purchasing or actually wearing the product force them to consider whether they would spend money on it.
Reddit communities and Discord servers give you honest feedback from niche audiences with no social pressure to be polite.
Check Demand Longevity on Google Trends

Use Google Trends to see if there's interest in your design concept or niche. If it hasn't held steady for at least 12-18 months, you're likely chasing a moment that's already passing.
Stable niches and evergreen community interests are far safer bets for a first launch than anything trend-dependent.
Search Your Niche on Etsy and Use eRank for Keyword Data

Etsy is still the dominant marketplace for independent apparel, and eRank provides free keyword search volume data to help you size actual demand.
If the top listings in your niche have thousands of sales and the relevant search terms carry real volume, there's a proven market. If listings have single-digit sales and keyword volume is thin, that's important data too.
Pre-Sell Before You Produce
One of the smartest ways to validate a clothing idea is to start selling before you commit to a production run.
To do this, create simple landing page or signup form that tells your audience “The first 30 orders get this at ($$$) price. Reserve yours now.”
If you can’t get 10 genuine commitments, the concept most likely isn’t ready yet. But if you can, you’ve just validated your product’s demand and potentially funded part of our first production run before spending a ton of money on inventory.
This approach becomes even more useful when you use a platform that supports pre-orders. While many ecommerce platforms require additional apps or plugins, Fourthwall allows you to set up pre-orders and made-to-order products using built-in fulfillment and shipping settings.
That means you can start collecting orders before your products are produced, giving you more confidence in what to manufacture and how much inventory to order.
Step 4: Determine Your Budget and Choose a Business Model
Now that you know what you're making and have confidence that people want it, it's time to make the most important decision in this entire guide: which business model fits your current budget, timeline, and goals.
We covered the three models in detail earlier. Here's how to match them to your reality:
If Your Budget is Under $500
Print-on-demand is your path.
You can launch a full product line with no upfront costs and be selling within days. The margins are thinner, but the risk is zero, and the speed is unmatched.
Use this stage to learn what your audience actually buys before committing money you don't have to models that require it.
If Your Budget is $1,000-$5,000
You have options. Wholesale or private-label options give you better per-unit margins and the ability to brand the product more fully than POD allows.
The tradeoff is inventory risk and the need to predict what will sell in advance. Only move here once you have real data, like sales history, engagement, or pre-sell commitments, that tells you what's worth stocking.
If Your budget is $10,000 or More
Custom cut-and-sew becomes viable. This is the model that produces genuinely unique products and builds the kind of brand equity that competitors can't easily copy.
But it demands patience (typically three months to a full year from concept to shelf) and deep confidence in your market, because the cost of being wrong is high.
When determining your budget, account for every real cost involved:
- Design and pattern development (including tech pack creation if you're doing cut and sew)
- Sample production and iteration (rarely just one round)
- Materials (fabric, hardware, buttons, zippers) if manufacturing your own
- Factory visits or communication costs if working with overseas manufacturers
- Shipping from the factory to you, and from you to customers
- Platform fees, storefront setup, and initial marketing
The brands that run into financial trouble usually do so because they budgeted for production and forgot everything around it.
Step 5: Navigating Custom Apparel Production Methods
The path from a design file to a physical garment in a customer's hands involves more decisions than most first-time brands expect.
The choices you make here directly shape your product quality, your margins, and your timeline.
Direct-to-Garment (DTG) Printing

A digital inkjet process that prints directly onto fabric with no setup costs and no minimum order quantities.
It can produce detailed, full-color designs without requiring large order quantities, making it a popular choice for print-on-demand stores and small clothing brands.
DTG works especially well for artwork with lots of colors, gradients, and fine details.
Pros
- Great for artwork with gradients and fine details
- Easy to test new designs with low risk
- Ideal for print-on-demand and small clothing brands
- Works well for one-off orders and small batches
Cons
- Higher cost per item than bulk printing methods
- Works best on cotton and cotton-blend fabrics
- Print durability can vary depending on garment quality
Screen Printing

The industry standard for volume production. It works by applying ink to fabric one color at a time through a stencil-like screen, creating bold, vibrant prints that hold up well over time.
While there is an upfront setup cost, the per-shirt price decreases as your order size increases, making it a great option for clothing brands, merch drops, and bulk orders.
This process is best for simpler designs with solid colors rather than highly detailed artwork or photographs.
Pros
- Lower cost per shirt on large orders
- Produces vibrant, long-lasting colors
- Durable and wash resistant
- Works on a wide variety of garment types
Cons
- Not cost-effective for small orders
- Each color requires a separate screen
- Complex, multi-color designs can become expensive
- Less suitable for photographs and highly detailed artwork
Embroidery

Commonly used for hats, polo shirts, and small details, embroidery uses thread stitched directly into the fabric rather than printing a design onto the surface.
The result is a textured, high-end look that many people associate with premium clothing.
While it usually costs more than printing, it's extremely durable and can last for years without fading or cracking.
Pros
- Creates a premium, professional appearance
- Adds texture and dimensions to designs
- Can increase your product’s value
- Great for logos, monograms, and small branding elements
Cons
- More expensive than most printing methods
- Not suitable for large or highly detailed designs
- Limited color gradients and photo reproduction
- Production costs can increase with complex designs or stitch count
Direct-to-Film (DTFx)
Direct-to-film is a printing method where your design is first printed onto a special film and then heat-pressed onto the garment.
It produces bright, vibrant designs and works on a wide variety of fabrics and colors, making it more flexible than other printing methods.
Lately, direct-to-film has become increasingly popular among many clothing brands because it works well across a wide range of products, from t-shirts and hoodies to tote bags and other accessories.
Pros
- Produces bright, vibrant colors
- Great for detailed artwork and complex designs
- No minimum order requirements
- Can be used on apparel, tote bags, and accessories
Cons
- Prints can feel thicker than DTG on some garments
- Less breathable in heavily printed areas
- Print quality depends heavily on how it’s applied
- Doesn’t have same long-term durability as screen printing
Sublimation
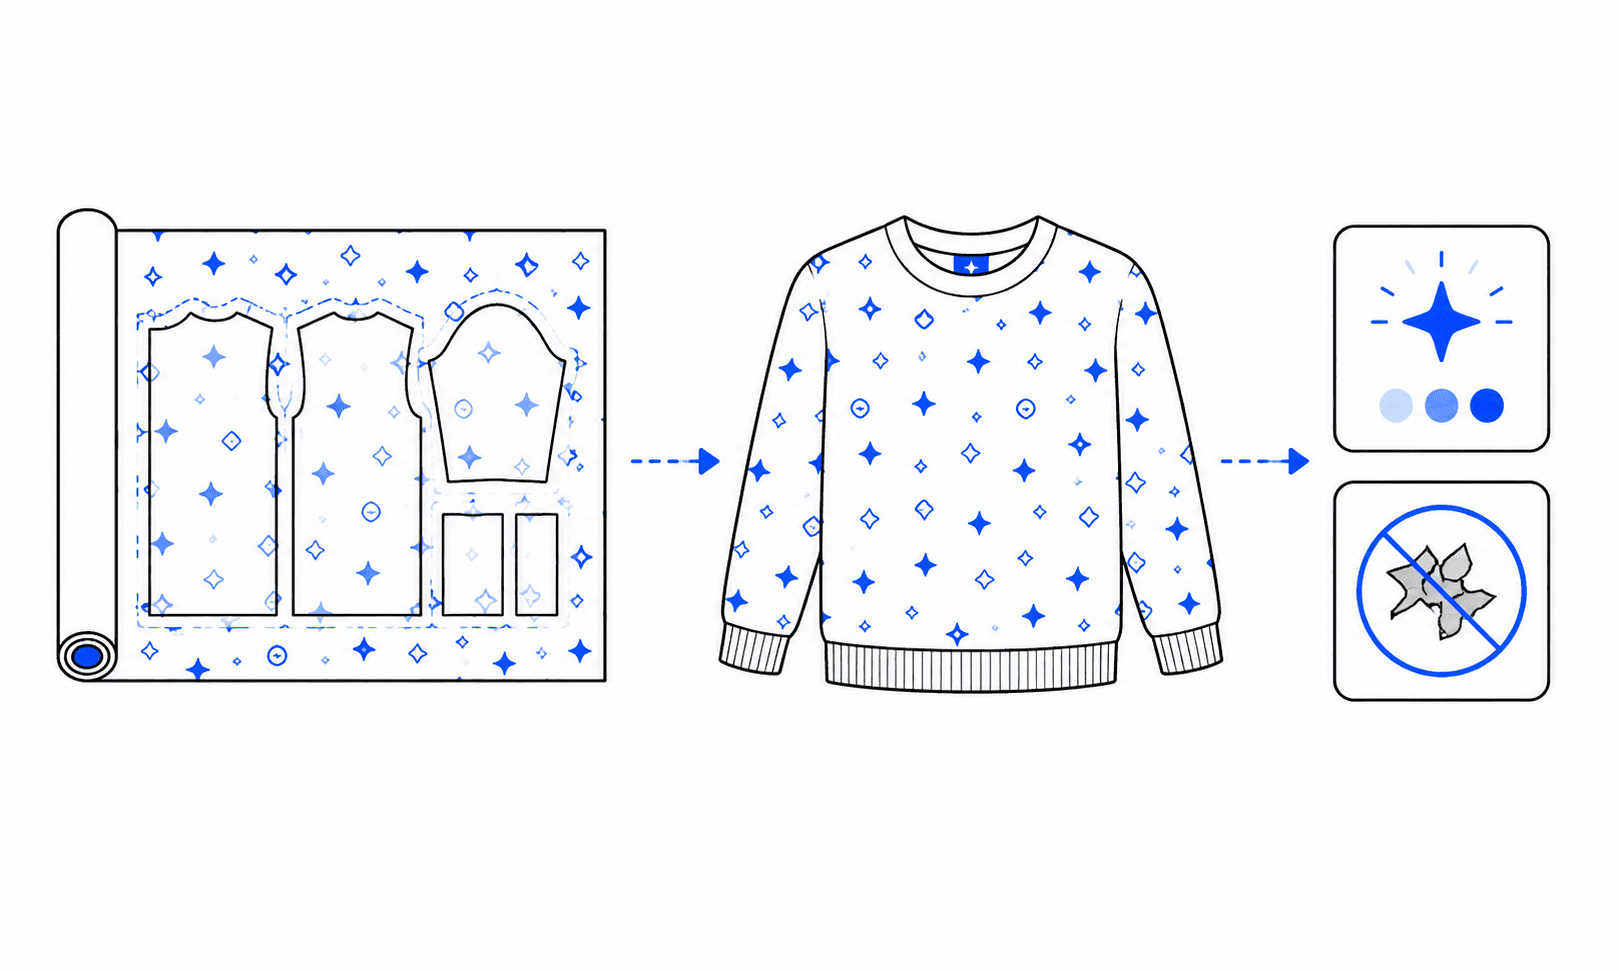
With sublimation printing, the design is infused directly into the fabric rather than sitting on top of it.
The artwork is then printed onto larger sheets of material before the garment is cut and sewn together, creating vibrant, edge-to-edge designs that can cover the entire product.
And because the ink becomes part of the fabric itself, sublimation prints won’t crack, peel, or fade the way some other printing methods do over time.
Pros
- Ink becomes part of the fabric, so designs won’t crack or peel
- Excellent color vibrancy and detail
- Lightweight feel with no raised print texture
- Ideal for bold patterns, graphics, and full-garment artwork
Cons
- Works best on polyester and polyester-blend fabrics
- Typically more expensive than standard t-shirt printing
- Require specialized equipement and production process
- Color consistency can vary across different fabric types
Cut & Sew

If you want absolute customization with your clothing line, cut-and-sew is the way to got. With this method, every piece of the garment is cut to your specification and then sewn together to create a completely unique product.
This method gives you full control over the fit, fabric, stitching, pockets, and every other detail of your garment.
Its the most popular approach used by many fashion brands because it allows them to create products that can’t be found anywhere else, but it does require more time, planning, and investment compared to the other production methods.
Pros
- Complete control over every aspect of the garment
- Choose your own fabrics, fit, stitching, and construction details
- Ideal for building a distinct fashion brand
- Potential for higher profit margins and premium products
Cons
- Highest startup costs of any production method
- Requires pattern making, sampling, and product development
- Often comes with high minimum order quantities
- More complex manufacturing and supply chain management
Sampling Before You Produce
No matter how well-designed your tech pack is, or how confident you are in the mockup, you need a physical sample in your hands before committing to a production run.
Samples reveal what screens never show: how a graphic actually sits on a moving body, how colors shift between monitor and fabric, whether the garment fits as you expected, and whether the stitching survives a wash cycle.
There are three types of samples worth understanding:
- Prototype Samples: These test your design and construction concept. They're produced in small quantities using representative fabric and are used to catch fundamental issues before more expensive production steps.
- Pre-Production Samples: They test whether the garment can be manufactured efficiently and consistently at scale. They use production-level materials and processes and are used to iron out manufacturing problems before a full run begins.
- Production Samples: Produced from the actual production run fabric and are used as a final quality check before approving the full batch.
The cost of sampling (usually $50-$300 per piece, depending on complexity) is a fraction of the cost of receiving 200 units of something you can't sell.
Ordering Samples with Fourthwall
If you're using Fourthwall, one of the easiest ways to test your products is by ordering samples directly from your dashboard before making them available to customers.
Samples are sold at cost, allowing you to see exactly what your audience will receive without investing in bulk inventory or committing to a large production run.
This gives you the opportunity to evaluate key details such as print quality, color accuracy, fabric feel, sizing, and overall product presentation before launch.
It can also help you create authentic product photos, videos, and social media content using the actual item rather than relying solely on digital mockups.
Taking the time to order samples can help you catch potential issues early and launch your clothing brand with greater confidence.
How to Find a Clothing Manufacturer

For wholesale, private label, or custom cut and sew production, finding the right manufacturing partner is among the most important decisions you'll make:
- Maker's Row: Nearly 10,000 US-based factories, with over 3,000 in apparel.
- Sourcify: Vetted manufacturer relationships in Asia, with facilitated sourcing and vetting support.
- Nature USA: Manufacturer with a focus on sustainable and ethical production.
- Sewport: Global manufacturer connections with built-in project management tools.
- Joor: An end-to-end platform that connects brands with retailers and handles much of the development workflow.
When you reach out to potential manufacturers, be organized, specific, and realistic about your volumes. Manufacturers work with many clients at the same time.
Brands that arrive with clear briefs and honest timelines receive better attention and service than those that are vague or demanding.
Step 6: Build Your Online Clothing Store

Your storefront is where the brand experience becomes real for the customer.
Before they've touched your product, they've formed an opinion based on what they see on your page, and that opinion determines whether they buy or leave.
Choose the platform that matches your stage.
- Fourthwall: The choice for Creators and brands with existing audiences. You get access to a built-in catalog of hundreds of premium print-on-demand products, along with a fully customizable online store that's free to set up with no monthly fees and no commission on physical product sales. Fourthwall also acts as the merchant of record, handling sales tax collection and compliance for you, while its support team assists customers with product and order-related issues.
- Shopify: One of the most capable and scalable options for brands serious about growth. At $39/month, it requires some upfront investment; however, its app ecosystem, theme quality, and integration capabilities justify the cost once you're generating real revenue.
- Etsy: Considered the fastest path to buyers who are already shopping for independent clothing. The platform charges roughly 10% all-in and limits your control over your brand, but the built-in traffic and purchase intent are valuable for early validation.
No Matter Which Platform You Use, Focus on the Basics
The platform you choose matters, but the fundamentals of your store matter even more.
When someone visits your website, they should immediately get a sense of your brand through your logo, colors, photos, and overall style.
Use product photos that show real people wearing your clothing whenever possible, since shoppers often find it easier to picture themselves buying and wearing the product.
Your product descriptions should also do more than list technical details. Explain what the item is, who it's designed for, and why someone would want it.
Before launching, make sure important information like shipping times, return policies, and size guides is easy to find. Customers are far more likely to complete a purchase when they can quickly find answers to their questions without contacting support.
Step 7: Pricing Your Clothing Line Products

Pricing is where most first-time clothing brands quietly set themselves up to fail. They price low to seem accessible, then discover they can't sustain operations, reinvest in inventory, or spend anything on marketing. Here's the math that actually matters.
Know Your Real Cost-Per-Unit
Production cost is just the start.
Your all-in cost includes production and packaging materials, shipping costs, platform fees, and an allocation of design and development costs based on your expected sales volume.
That number is your floor. Price below it and you're subsidizing every sale.
Typical Pricing Ranges for Independent Clothing Brands
These ranges aren't theoretical. Across hundreds of thousands of units sold on our platform in the last 90 days, the average independent t-shirt sells for about $26, a hoodie for about $45, and a long-sleeve tee for about $33.
Don't Race to the Bottom
One of the biggest takeaways from our data is that many independent brands are already pricing their products at the lower end of the market. In other words, there's often more room to raise prices than most founders realize.
The customers you want aren't necessarily looking for the cheapest option. They're looking for products that feel worth the price.
If your hoodie is priced to compete with fast-fashion retailers, customers will compare it directly to those brands, and it's difficult for a small independent business to win that battle on volume alone.
Charging more doesn't automatically drive customers away. In fact, some of the most thoughtfully curated brands on the platform generate an average order value of around $80, compared to roughly $48 for fully self-serve shops.
That's about 65% higher, showing that customers are often willing to spend more when they see unique products, strong branding, and a clear value proposition.
Build a Promotional Room into Your Base Pricing
If you plan to run a launch discount, offer promo codes, or run seasonal sales, that margin needs to be in place before you reduce it.
Brands that launch at their actual cost floor have nowhere to go.
Remember, Shipping is Never Free
If you're offering free shipping, you're either building the cost into your product price (the sustainable approach) or absorbing it out of margin (which fails at scale).
Know your average order weight, your carrier rates by destination, and what order value threshold makes free shipping work before you advertise it.
Step 8: Branding Your Clothing and Packaging
The physical experience of receiving your product is part of the product itself.
It's one of the few moments where your customer's attention is entirely on what you sent them, and the sad part is that most clothing brands waste it with a plain mailer and nothing else.
Brand Your Garments with Intention

Custom labels and hangtags are where your garment goes from feeling like a blank to feeling like a brand.
A scratchy, thin label makes even a good hoodie feel cheap before it's been worn once. A well-sewn woven label in a quality material signals craftsmanship before a customer has read a word.
Here are the label types worth knowing:
- Center Fold Labels: The most common type, sewn into the collar. The baseline for any clothing brand.
- Manhattan Fold Labels: Similar to center fold, but with the top folded for a more finished look. A step up in perceived quality.
- Woven Patch Labels: Sewn onto the outside of the garment, whether on the sleeve, hem, or back neck. Provides visible brand placement without a printed graphic.
- Straight Cut Labels: Sewn flat onto the garment, often used as exterior decorative patches with a logo.
- Loop Fold Labels: Sewn into the interior hem or waistband, typically used for care and sizing information.
If you're using Fourthwall, you can include custom neck labels and woven labels on bespoke apparel products, allowing you to replace the manufacturer's tag with your own branded label.
Choose the Right Packaging Format

- Shipping Boxes: Sturdy, premium, and suitable for both heavier and delicate items. They add weight and cost, which increases your shipping expense, but protect high-value garments and create a more elevated unboxing experience.
- Custom-Printed Boxes: Take the unboxing experience a step further with a box that matches your brand aesthetic. Available through suppliers like Arka, PakFactory, and Refine Packaging.
- Poly Mailers: A practical default for most clothing brands. They're lightweight, inexpensive, available in custom-printed versions, and sufficient for most non-fragile garments. Suppliers like Sticker Mule and Uline offer custom-branded options at competitive minimums.
- Bubble Mailers: These offer a middle ground, providing more protection than a poly mailer without the bulk and cost of a box. Good for items that need cushioning but don't warrant full box packaging.
Add Little Touches Inside Your Package

At minimum, use tissue paper or a deliberate fold that presents the garment rather than dropping it loosely.
Then, make sure you add an insert, like a thank-you card or a brief note about the brand. None of this has to be expensive, and it will give your brand so much credibility.
Here are some extras that tend to make brands stand out:
- Promo Code Inserts: Drive repeat purchases from people who've already converted, turning them into loyal customers.
- Personalized Notes: Build loyalty that no ad can replicate, especially with your first customers and high-value buyers.
- Branded Stickers: Inexpensive, shareable, and often end up on laptops and water bottles. Major brand exposure with a very low unit cost.
Fourthwall can take this a step further by adding custom inserts to print-on-demand orders.
These premium printed cards can feature thank-you messages, discount codes, QR codes, membership offers, social media links, or information about upcoming product launches.
You can also include branded stickers that customers can place on laptops, water bottles, notebooks, and other personal items, helping spread awareness of your brand long after the package arrives.
Step 9: Market and Scale Your Clothing Line
Launching your clothing line is only half the battle.
Once your products are live, your focus shifts from designer to marketer by working on getting them in front of the right people and building your customer base.
The good news is that you don't need a huge marketing budget to start growing. Below are some key steps you can take to help promote your clothing brand online.
Use Social Media to Show Your Brand in Action
Platforms like Instagram, TikTok, and YouTube are the best for showcasing your clothing line because you can create branded content that's tailored for your followers.
But the brands that actually build audiences on these platforms aren't just posting product shots; they're bringing people inside the process.
Behind-the-scenes content consistently outperforms polished product advertising for independent brands because it provides an honest look into your brand rather than a commercialized gimmick.
A few formats that tend to perform well:
- Document the Build in Real Time: Show the design process from sketch to finished file, share the moment your samples arrive, and film your honest reaction when you open the box. These moments feel real because they are, and that authenticity is exactly what builds the kind of trust that converts followers into buyers.
- Show the Product on Real People in Real Settings. A flat-lay mockup tells people what the product looks like. A video of someone wearing your hoodie on an actual day out tells them how it fits into a life. Whenever possible, get your products on people, like friends, early customers, or anyone who represents your target customer, and photograph them in natural environments rather than staged ones.
- Turn Your Customers into Content. Encourage buyers to tag you when they wear your pieces and repost that content regularly. User-generated content does two things at once: it gives you a steady stream of authentic material to share, and it signals to potential customers that real people are buying and wearing your brand.
- Use Trending Audio and Formats Strategically: On TikTok and Instagram Reels, pairing your content with trending audio can dramatically extend its reach beyond your existing followers. You don't need to chase every trend, just be aware of what's moving on the platform and look for natural fits with what you're already making.
- Post Consistently, Not Perfectly: A steady cadence of genuine, imperfect content will outperform sporadic, highly produced posts almost every time for an independent brand at this stage. Aim for three to five posts per week across your primary platform, and treat each one as a small experiment in what your audience responds to.
Remember, the goal here isn't to go viral. It's to give the right person (your specific customer) enough reasons to trust you before they ever reach your store.
Start Building an Email List Early

Social followings come and go with algorithm changes. An email list is yours.
The benchmark is $36 returned for every $1 spent, and while individual results vary, the long-term value of a well-maintained email list is hard to ignore.
The earlier you start building it, the more it compounds. Even a list of 200 genuinely interested people will outperform a social following of 10,000 passive ones when it comes to driving sales.
The key is giving people a real reason to hand over their email address. A few approaches that work well for clothing brands:
- Offer a First-Order Discount: A simple "sign up for 10% off your first order" converts well because the value is immediate and obvious. It also turns your email capture into a sales driver from day one.
- Create Early Access Drops: Position your email list as the place where subscribers hear about new releases before anyone else. For clothing brands doing limited drops, this is genuinely valuable because people will sign up just to avoid missing out.
- Use Your Thank-You Page: Right after someone completes a purchase is one of the highest-engagement moments you'll ever get. A prompt like "Join our list for exclusive restocks and early access" on your post-purchase page captures buyers at the peak of their interest in your brand.
- Add a Signup Form to High-Traffic Pages: Your product pages, homepage, and any blog content you produce are all opportunities to embed a low-friction signup form. Keep the ask simple and lead with the benefit.
Once people are on your list, use it deliberately by announcing product launches, restocks, limited drops, and promotions.
Platforms like Klaviyo are built specifically for this kind of ecommerce email marketing, with automations like cart abandonment emails that recover sales you'd otherwise lose entirely.
If you're not sure where to start, check out our guide on the best strategies for attracting more email subscribers and creating effective signup offers.
Create Excitement With Limited Releases

One of the simplest ways to drive faster sales is to make a product available for a limited time or in a limited quantity.
When customers know a design won't be around forever, waiting starts to feel like a risk, and that nudge is often enough to turn a "maybe later" into a purchase today.
The catch is that scarcity only works when it's real. If every product is "limited" and nothing ever actually sells out, your audience learns to tune out the urgency.
Decide What Kind of "Limited" You Mean
There are two levers, and they create different kinds of pressure:
- Time-Limited: This is when the product is available for a set window, then it's gone. It works well for seasonal collections, anniversaries, or anything tied to a moment, like a tour, a launch, or a holiday. The deadline does the work.
- Quantity-Limited: You produce a fixed number and stop. This fits premium or collectible pieces, where "only 100 made" is part of the appeal. Numbering each one (1 of 100) makes the scarcity tangible.
You can combine the two, but lead with the lever that fits the product. For instance, a holiday tee is a time play, while a hand-finished jacket is a quantity play.
Tactics That Actually Create Urgency
- State the Constraint Up Front: "Available through Sunday" or "Only 150 made" belongs on the product page and in every promo. Scarcity nobody knows about does nothing.
- Build the List Before the Drop: Open a notify-me or email signup a few days ahead so demand is already waiting when the product goes live. A drop with no audience is just a regular product with a deadline.
- Tease, Then Count Down: Reveal the design early, then run a visible countdown as the window closes. The final 24 to 48 hours usually do the heaviest lifting, so save a reminder push for the end.
- Decide Restock-or-Never in Advance, and Say It: "This won't be restocked" raises the stakes, while "back for 48 hours only" rewards the people who missed it the first time. Either approach is fine. Just know that quietly restocking something you called "limited" can damage trust with your customers.
Where This Works Best
Limited releases pair naturally with seasonal collections, collaborations with other creators, exclusive colorways of an existing bestseller, and one-off commemorative pieces.
People already expect those things to be fleeting, so the scarcity reads as honest rather than manufactured.
Whatever format you choose, make the end date or quantity clear and then hold to it. The entire strategy runs on your audience believing you when you say something is going away.
Work With Small Creators and Influencers

A single post from someone your target customer genuinely follows can drive more first orders than weeks of paid advertising.
Prioritize micro-influencers (5,000–50,000 followers) in your specific niche over mass reach, and you'll see that the conversion rates are meaningfully better since their audiences tend to be more engaged and interested in what they're selling.
However, "collaborating with influencers" means more than just sending a free shirt and hoping for a post. Here are a few ways independent clothing brands are actually making it work:
- Send a Gifted Product with a Specific Ask: Rather than a generic PR package, send a product that genuinely fits the creator's aesthetic and include a short, personal note explaining why you thought of them. Don't ask for a guaranteed post, rather, ask if they'd be open to sharing it if they love it.
- Offer a Custom Affiliate Code: Give the creator a unique discount code tied to a commission on every sale they drive. This costs you nothing upfront and gives you clean attribution data on what's actually converting.
- Co-Create a Limited Drop: Invite a creator to design or name a colorway, style, or limited run with you. They promote it because it's genuinely theirs and your brand gets exposure to a community that already trusts the person endorsing it.
- Use TikTok Shop's Affiliate Program: Sample your product through TikTok Shop so that creators can request it directly and earn a commission when their content converts. This flips the outreach model entirely; and instead of you pitching creators one by one, interested creators come to you.
The common thread across all of these is that the best creator partnerships feel like collaborations, not transactions. The more a creator genuinely connects with your product, the more their audience will too.
How to Use Paid Advertising Without Burning Your Budget

Paid ads rarely make sense as a first marketing investment for a brand with no sales history and jumping in too early can be one of the fastest ways to drain your launch budget without much to show for it.
Here's why the math is trickier than it looks. On Fourthwall, the average order value is about $55. If your margin is 35%, you have roughly $19 to spend acquiring a customer before that sale becomes unprofitable.
On Meta or TikTok Ads, that's workable, but only if the person seeing your ad already knows who you are.
For cold audiences with no prior exposure to your brand, a $19 customer acquisition cost is very difficult to hit consistently, especially without the data and creative history that makes ad algorithms perform.
A few principles worth following before you spend a dollar on paid:
- Wait Until You Have SSales Data: Ads perform best when the platform has conversion events to optimize against. Running ads to a store with zero purchase history means the algorithm is flying blind. Get your first 20–50 sales organically, then let that data do the heavy lifting.
- Start with Retargeting, Not Prospecting: Your warmest audience (people who've visited your store, added something to their cart, or already bought from you) will always convert at a lower cost than strangers. Set up a simple retargeting campaign on Meta before you touch cold traffic. Even a $5–$10 daily budget against a warm audience teaches you a lot about what creative and copy actually works.
- Test with Small Budgets Before Scaling: Run $20–$30 per day across two or three creative variations and let them run for at least five to seven days before drawing conclusions. Cutting ads too early based on early performance is as costly a mistake as overspending on something that isn't working.
- Let Organic Content Inform Your Ads. The posts that get genuine engagement on TikTok or Instagram are your best candidates for paid amplification. You're not guessing at what resonates; the audience has already told you.
Paid advertising can become a meaningful growth channel for a clothing brand, but it rewards patience and data. Build the foundation first, then use ads to accelerate what's already working.
First 30 Days: A Week-by-Week Launch Plan
Strategy without execution is just planning. Here's a literal four-week roadmap for starting from scratch.
Week 1: Foundation Goal: Niche defined, concept validated, direction confirmed.
- Days 1-2: Define your niche and specific customer using the framework in Step 1. Write one sentence describing exactly who your brand is for.
- Days 3-4: Run the validation playbook from Step 3, and post concepts on social media or other relevant online communities. Check Etsy search and Google Trends to see if there's a demand for your niche.
- Days 5-6: Sketch 5-8 design concepts rough enough to evaluate direction, polished enough to share. Post them and collect real reactions.
- Day 7: Choose your brand name and then verify if the domain and social handles are already available before you get attached to it.
Week 2: Build Goal: Designs finalized, production method chosen, storefront set up.
- Days 8-10: Finalize your designs. If you're hiring an illustrator, make sure you're on the same timetable leading up to production. If designing yourself, finish your files and verify they meet the production specs your platform or printer requires.
- Days 11-12: Set up your storefront. If you're using Fourthwall, the platform walks you through design upload, store customization, and product setup in 60-90 minutes.
- Days 13-14: Upload your designs, write product descriptions, set prices. Every product should have at least three quality images or mockups. Order samples of every product you plan to sell.
Week 3: Launch Goal: First 10 sales.
- Days 15-16: Samples arrive. Photograph them on real people and in real environments. These photos should replace your mockups as primary product images.
- Days 17-18: Soft launch to your existing audience, whether that's on social posts or through an email if you have a list. No grand announcement yet. You're testing the checkout flow and collecting initial feedback before you push volume.
- Days 19-21: Post content daily. You can do this by wearing the products in your videos, showing how they were made, or by sharing your brand's story. Use the specific hashtags your target community actually uses.
Week 4: Iterate Goal: Know what worked, what didn't, and what comes next.
- Days 22-24: Audit your data honestly. Which products were sold? Which got traffic but no conversions? Which got nothing at all? Sales data reveals what people will actually pay for; engagement data reveals what they're curious about. Both matter.
- Days 25-26: Reach out to your first buyers directly. A personal thank-you, a follow-up email, or a handwritten note creates the kind of loyalty that drives repeat purchases and word-of-mouth referrals; two things no paid campaign can replicate.
- Days 27-28: Plan your next release. Winning products get variations, like new colorways, complementary pieces, and a bundle. Non-performers should get replaced or reconsidered entirely.
- Days 29-30: Honest review. Are you above zero in sales? What surprised you? What assumption turned out to be wrong? The brands that grow are the ones that treat month one as information, not a verdict.
If you're starting from zero with no existing audience and make $500 in your first 30 days, that's a meaningful signal.
But if you're launching to an engaged existing community and move $1,500-$3,000 in your first month, your fundamentals are working.
Either way, month one's job is to teach you what month two should look like.
Your Clothing Line Toolkit Roundup
Starting a clothing line is much easier when you have the right tools from the beginning.
Instead of wasting time jumping between dozens of platforms and resources, use this toolkit to help you design products, launch your store, and market your clothing line more efficiently.
Design Tools
- Procreate: Hand-drawn illustration, iPad. $13 one-time.
- Adobe Illustrator: Industry-standard vector design. Subscription required.
- Canva: Beginner-friendly, strong for text-driven designs. Free tier available.
- Figma: Precise vector control with a design background. Free for most uses.
- Kittl: Template-based tool popular with independent merch Creators. Paid.
Finding a Designer
- Fiverr: Budget-friendly freelancers, broad quality range.
- Dribbble: Portfolios from established illustrators.
- Behance: Adobe's portfolio network, strong for apparel illustration.
- Fourthwall Design Community: Vetted network of artists with Creator merch experience.
Validation and Research
- Google Trends: Track search interest over time.
- eRank: Etsy keyword and search volume data, free tier available.
Manufacturer Sourcing
- Maker's Row: US-based factory directory, 3,000+ apparel manufacturers.
- Sourcify: Asia-based manufacturer sourcing with vetting support.
- Nature USA: US-based sustainable and ethical manufacturer.
- Sewport: Global connections with project management tools.
- Joor: End-to-end product development and manufacturer platform.
Print-on-Demand Platforms
- Fourthwall: Creator-focused POD storefront with a buit-in catalog of hundreds of premium products. Zero monthly fees and no sales commission.
Storefronts
- Fourthwall: Free for Creators and brands, integrates with YouTube, TikTok, Instagram, and Twitch.
- Shopify: Best-in-class for scaling clothing brands. $39/month.
- Etsy: Built-in buyer traffic, higher fees, limited brand control.
- WooCommerce: Open-source for self-hosted stores.
Packaging Suppliers
- Arka, PakFactory, Refine Packaging: Custom-branded shipping boxes.
- Sticker Mule, Uline: Custom poly mailers and branded stickers.
- Custom Labels 4 U: Clothing labels and hang tags.
Email Marketing
- Klaviyo: Best-in-class for ecommerce automation and segmentation.
- Mailchimp: Beginner-friendly with a solid free tier.
- beehiiv: Strong newsletter and subscriber management.
- Substack: Subscription newsletters for product updates.
Shipping
- Pirate Ship: Discounted USPS commercial rates, no monthly fee.
- ShipStation: Multi-carrier shipping management for higher volumes.
- USPS, UPS, DHL, FedEx: Each one offers business account programs with discounted rates and better management tools.
Why More Creators Are Choosing Fourthwall to Start Their Clothing Line
Starting a clothing brand can feel overwhelming when you're trying to manage product design, inventory, shipping, customer service, and your online store all at once.
That's why many creators choose Fourthwall. The platform lets you design and sell custom apparel without buying inventory upfront, while also handling production, shipping, and customer support behind the scenes.
You can connect your store directly to platforms like YouTube, TikTok, Instagram, and Twitch, making it easier for fans to discover and purchase your products.
If you're looking for a simple way to launch a clothing line and focus more on growing your brand than managing logistics, Fourthwall gives you the tools to get started without the usual headaches.
FAQ
You don't legally need an LLC to start a clothing brand. You can sell as a sole proprietor using your personal name and Social Security Number for tax filings. Most independent clothing brand founders form an LLC once sales pass a few thousand dollars per year, because an LLC separates personal assets from business liability, opens business bank accounts, and simplifies invoicing with manufacturers. LLC filing fees vary by state ($50 to $500).
To trademark a clothing brand name in the U.S., file a trademark application with the United States Patent and Trademark Office (USPTO) under class 025, which covers clothing, footwear, and headwear. The USPTO's TEAS Plus filing costs $250 per class as of 2026, and full examination averages 12 to 18 months. Before filing, run a free search at tmsearch.uspto.gov to confirm no other brand already holds the mark. A registered trademark grants nationwide rights on apparel and lets you enforce against counterfeiters; common-law rights exist without registration but only cover the geographic area where you actually sell.
You can start a clothing brand with $0 upfront using print-on-demand fulfillment, which produces and ships each garment only after a customer pays. Platforms like Fourthwall charge no monthly fee, no minimum order, and no product cost until a sale happens, so the only unavoidable early spending is a domain name (about $10 per year).
A tech pack is a technical specification document that tells a clothing manufacturer exactly how to produce a garment: measurements, materials, stitching, labels, colorways, print placements, and packaging. Cut-and-sew and wholesale/private-label clothing lines need a tech pack because most manufacturers refuse to quote or produce without one. Print-on-demand clothing brands do not need a tech pack, because the platform (like Fourthwall) supplies the blank garment and only requires the print-ready design file. A basic tech pack costs $50 to $300 through a Fiverr or Upwork designer.
A print-on-demand clothing brand can go from idea to live store in days, using platforms like Fourthwall that require no inventory or supplier setup. Custom cut-and-sew clothing takes a minimum of three months and often runs six to twelve, depending on manufacturer lead times and design complexity.
Matt Keyser is a writer at Fourthwall who lives at the intersection of social media and Creator culture. With 4+ years of experience covering industry trends, his work focuses on helping Creators and brands understand how to turn their passion into a thriving business while maintaining a constant pulse on the latest eCommerce and social media trends.


You might also like

How Much Does TikTok Pay in 2026? A Detailed Breakdown

How to Make Money as a Content Creator the Smart Way

25 Best Ways to Make Money With Your Phone for Beginners

How Many Views Is Viral in 2026? Benchmarks by Platform

15 Best Ways to Make Money as a College Student

10 TikTok Live Ideas to Engage Your Audience in 2026

How to Grow Social Media Followers: 8 Proven Methods for Creators

How to Start a Swimwear Line in 2026: A Step-by-Step Guide

How to Start a Sticker Business in 8 Steps

Keep up with the latest from Fourthwall
New features, product updates, trend breakdowns, and creator stories — straight to your inbox.