
How to Start a Sticker Business in 8 Steps


You might not think it, but stickers are actually one of the most profitable products for small creators to sell.
They’re cheap to make, easy to ship, and they're perfect for fans who want a piece of your merch but aren’t too keen on spending $40 on a hoodie. But there’s a lot more to starting a sticker business than just coming up with a design and promoting it online.
In fact, what most “how-to” articles neglect to tell you is all the nitty-gritty stuff that goes into your sticker launch. Things like: how to validate your idea, what kind of designs actually sell, how shipping can quietly destroy your margins, and which choices separate the shops that grow from the ones that quietly close after six months.
Fortunately, this guide will help answer those questions and more, using real data from Fourthwall and from thousands of creators we’ve seen succeed and fail with their own sticker launches.
To help you get a better understanding of where we’re coming from, here's a quick rundown of the last 12 months of data when it comes to Fourthwall and sticker sales:
- Over 168,000 stickers sold, generating roughly $1.06M in sales.
- Our average sticker price is $6.28 (compared to a platform-wide average of $54)
- Sticker sales are up 66% year-over-year, with unit volume up 68%, indicating the category continues to expand.
- Roughly 70% of all sticker sales come from small-tier creators…aka solo merchants with no team.
Not only are stickers a cost-effective product to sell, but the above data also shows that you don’t need millions of followers to generate real profit for your sticker business. Because the people who are thriving in the sticker game are solo creators with solid designs and a tight-knit audience willing to support them.
This guide will show you how to be one of them.
Key Takeaways
- Learn how to validate sticker ideas before wasting time and money on designs nobody wants.
- Understand which sticker styles, niches, and product types are actually selling based on real creator data from Fourthwall.
- Discover the differences between DIY sticker production, bulk ordering, and print-on-demand so you can choose the best option for your budget and goals.
- Get a step-by-step roadmap for designing, pricing, marketing, and scaling your sticker business as an independent creator.
Before You Start Designing, Take 48 Hours to Validate Your Ideas
It’s understandable to want to jump into things right away, especially if you have a really cool idea floating in your head and you think it’ll be a hit.
But the truth is, many first-time sticker shops end up failing because the seller spent most of their time and resources creating something nobody wants. To avoid this potential downfall, take some time to sit with your idea and validate it before you move forward.
Here’s what you can do in 48 hours using free tools to help affirm your sticker design:
- Sketch your designs out on paper or use design tools like Canva or Procreate to draft a rough version to help test your concepts.
- Post your sketches on TikTok, Instagram, or X and ask your followers for their input. If you want to be a bit more anonymous, Reddit and Discord are perfect for unbiased opinions and for finding niche communities that might like your work.
- Use Google Trends to see if there’s an interest in your idea. If it hasn’t been gaining traction for two years, you're probably dealing with a lost cause.
- Check whether your sticker designs are in demand on Etsy and eRank. Use Etsy to search your niche and see if there’s already a healthy market for it. eRank can give you keyword search volume data for free, which is useful for sizing demand before making a commitment.
- Bonus option: Pre-sell. Post a mockup of your sticker on social media with a link to a Google Form. Your post can say something in the lines of “first 25 people get one shipped for $4 when it launches.” If you can’t get at least 5 commitments, the idea isn’t ready. But if you do get five or more, then CONGRATULATIONS! You just funded your sticker production.
A weekend of this saves you two months of designing into a void.
Starting a Sticker Business in 8 Steps
Once you’ve taken some time to marinate on your ideas, it’s time to start planning your sticker operation. But the real question remains…where do you begin?
Opening an online store and designing your stickers is one thing, but if you don’t have a clear plan that covers all your bases, you might find yourself in a bind before you get started.
Below, we’ve carefully broken down a solid step-by-step process to help you get your sticker business up and running.
Step 1: Pick a Niche Before You Pick a Sticker
Before you pick a niche, it helps to know which patterns work.
Almost every successful sticker shop fits into one of three archetypes. Understanding which one best suits your needs might just be the difference between your stickers selling or not.
Fan-Community

This is the model most creators go with because many of them already have a community or fandom that they belong to.
It doesn’t matter if you’re a gamer, play D&D, love anime, or are a huge Taylor Swift fan; creating stickers tailored to a specific community or fandom you’re part of can help you connect with like-minded customers who are willing to buy your product.
The best part of this model is that you don’t need to go out looking for customers since you can find them on most community platforms and forums like Reddit, Discord, and Facebook Groups.
Aesthetic-Illustration

Do you have a distinct visual style that translates well to a sticker?
Creating stickers that represent your artistry can be rewarding because you’re offering one-of-a-kind pieces that reflect your body of work.
The best part of this model is that customers don’t just buy one sticker; they buy the whole collection. Success here comes from consistency because ten stickers in one strong style beats fifty stickers in mixed styles. Your style is the brand.
Humor and Relatable

With this model, you’re catering to one specific thing—humor.
These are stickers that are funny, oddly specific, or oddly true. Think: "I would die for my cat," "still recovering from grad school," "professional overthinker," "girl dinner enthusiast."
Designs are mostly text and usually simple to create (type-led, often single-color), but the writing has to land. The best ones get screenshotted and reposted, which is free marketing.
Step 2: Understand What Actually Sells
Now this is the part where most “how-to” guides become a little vague.
Sure, you can look online and get a general consensus of what type of stickers sell and which ones don’t. But having real, consistent data at your side can help you determine which styles are worth selling.
Here's how the sticker category has broken down on Fourthwall over the last three months:
Kiss-Cut Stickers

Kiss-cut stickers account for roughly 65% of all sticker units sold, with an average selling price of $5.14, making them the go-to option for most creators because they’re affordable to produce, easy for customers to buy, and simple to design.
The kiss-cut format leaves the sticker attached to a square backing, which makes the stickers easier to peel, package, and ship while giving customers the classic vinyl sticker look they expect.
Kiss-Cut Holographic Sheet

At $13.40 per unit and accounting for 12% of all sticker units sold, holographic sticker sheets, on average, can sell for more than 2x the price of a standard kiss-cut.
If your design uses bold shapes, type, or anything with a strong silhouette, holographic is worth offering as a premium variant. You won't sell as many, but the order value jumps.
Kiss-Cut Sheet with Custom Background

Kiss-cut sheets with custom backgrounds make up about 13% of all sticker units sold on Fourthwall and sell for $8.65 per sale.
Since you can fit four to six matching designs onto one sheet, they’re one of the easiest ways to increase how much customers spend without needing them to add several separate products to their cart.
Kiss-Cut Vinyl Decals

Vinyl decals are popular for logo and lettering designs.
While they account for about 7% of sticker units sold and average around $4.01 per unit, they’re a smart product to add once you know which designs and branding styles your audience already responds to.
Die-Cut Stickers

Die-cut sticker (starting at $6.06 per sale and accounting for 4% of units sold ) is what people want when they're putting a sticker on a laptop or water bottle and don't want a visible square outline.
They’re shape-cut all the way through, with no rectangular backing, which gives them a more polished look that stands out on any product.
Step 3: Design Stickers That are Visually Appealing
When designing your stickers, it’s important to consider how they’ll look across different sizes and surfaces they'll be applied to.
A great sticker design should be clear at thumbnail size on Instagram, at full size on a laptop, and easy to glance at from across a room.
A few rules of thumb that hold up:
- High Contrast Wins: Stickers live on cluttered surfaces. Your design competes with laptop stickers from other artists, screen glare, and the laptop itself. Bold outlines and high contrast read at any size.
- Limit Your Color Palette: Three to five colors usually beat fifteen. It also looks more like a brand than a random clipart.
- Test at Small Sizes: Most stickers ship at 3" or smaller. If your design loses its punch at that size, redesign it.
- Build a Visual System, Not One-Offs: A line of 10 stickers in the same style sells better than 10 stickers in 10 styles. Remember, the style is what's recognizable. The individual sticker is just an entry point.
Design Tools That Get the Job Done
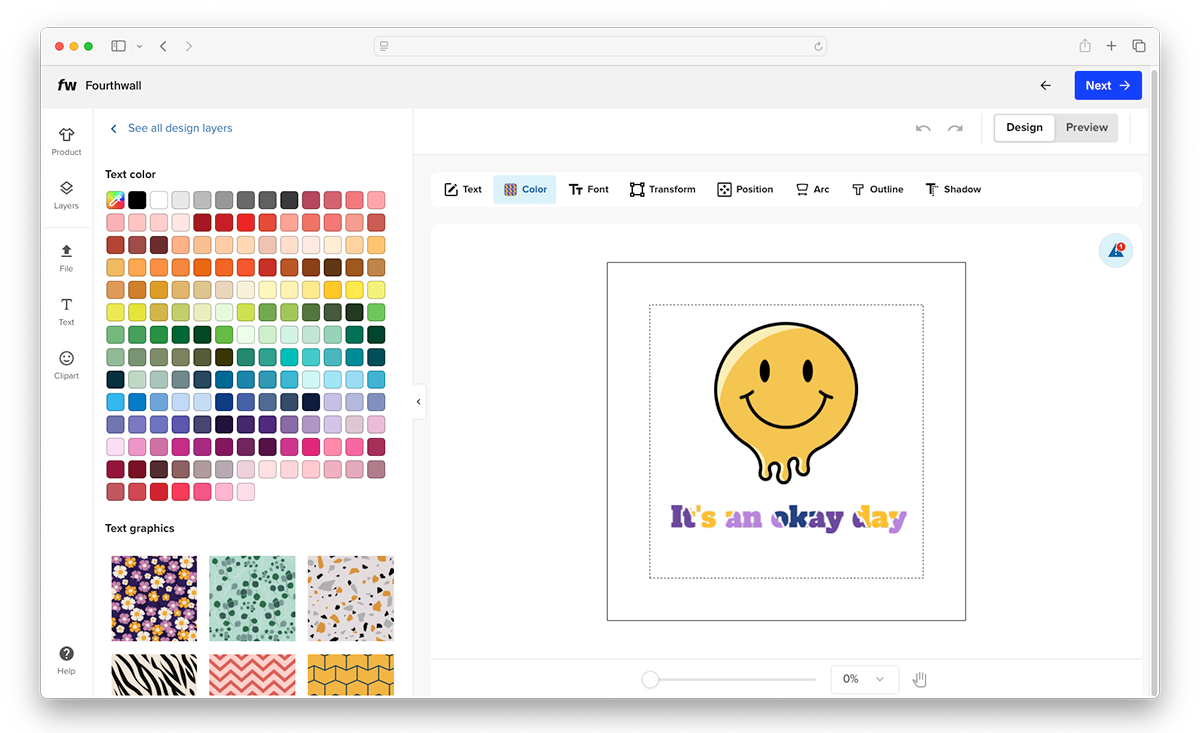
You don't need expensive software to design good stickers.
There are plenty of free and affordable design tools available, each with its own strengths depending on your skill level, design style, and the type of stickers you want to create.
Here's what creators are actually using:
- Canva: Great for beginners, especially if your stickers are text-led designs and simple illustrations.
- Procreate: The go-to tool for hand-drawn illustration stickers, available on iPad.
- Adobe Express: Similar to Canva but with better integration with Adobe's other tools.
- Figma: Great if you have any design background and want full vector control.
- Fourthwall: Use Fourthwall’s design tools to turn basic clip art and text into visually stunning stickers.
- Inkscape: Free, open-source vector editor; the budget alternative to Adobe Illustrator
- Kittl: A newer paid tool with strong design templates, increasingly popular with merch creators.
You can even leverage AI-powered design tools like Uizard and Figma AI to help you brainstorm concepts, test out ideas, and generate rough mockups before you finalize your design.
What to Do If You Can't Draw?
You don't have to be an illustrator to create your sticker design. Plenty of successful sticker shops are run by people with strong taste and zero drawing ability.
To help you out, here are three paths that you can take to have quality design stickers without having to do it yourself:
- Hire a Freelance Illustrator: Platforms like Fiverr, Behance, and Dribbble allow you to hire budget-friendly designers, with most of them charging anywhere from $50-$200 per design.
- Fourthwall's Design Community: Fourthwall provides a vetted network of artists who work with creators on merch projects, so they understand production constraints and file specs up front.
- Collaborate: If you have an audience but no drawing skill, find an artist who has the skill but no audience. Split revenue. Both sides win.
How to Write a Design Brief that Gets You Quality Work
If you’re going to hire an illustrator, the quality of the work you get back is roughly proportional to the quality of the brief you send.
Writing a vague brief with little information about your design specs can lead to vague work and burn through your budget. But writing a clear, specific brief to your designer can help them produce a sticker design you can actually launch.
To get the best design you can from your illustrator, use this template:
Project: [Name of sticker/sticker pack]
Audience: Who is this for? Be specific. Example —"Cottagecore TikTok, mostly women 18–28, who already buy plant-themed merch." Not "everyone."
Mood/Vibe (3 words): e.g., "Soft, witchy, nostalgic," or "Bold, ironic, late-90s."
References: 5–10 image links of the styles you want it to feel like. Pinterest, Instagram, and other artists' portfolios are fair game. Include 2–3 examples of what you don't want, too.
Color Palette: Either provide hex codes or describe ("earthy browns and sage greens, no neon").
Subject Matter: What's the sticker for? Be specific. "A toad sitting on a mushroom, holding a teacup. Toad has a slightly grumpy expression."
Format: Kiss-cut sticker, roughly 3" tall, vertical composition, transparent background, single image (not a sheet).
File needs: 300 DPI PNG with transparent background. Working file (PSD, AI, or Procreate file) included.
Deadline: [Date]
Budget: [$X for the design, $X if it includes 1 round of revisions]
The two things creators most often skip are references and specific format requirements. Both are critical. Without references, the artist guesses. Without format specs, you get back beautiful art you can't actually use as a sticker.
A Quick Design Checklist Before You Upload
Before you publish a sticker to your shop, run through this list to make sure your design comes out in the best possible format:
- Design is at least 300 DPI at final print size
- Transparent background (PNG file, not JPG)
- No text smaller than 14pt at final print size
- Important elements are at least 1/8" from the edge of the cut line
- Design reads clearly at thumbnail size (test by viewing on your phone)
- You've ordered a sample of the actual product before listing it
That last one is the most-skipped step and the most expensive to skip. Spend the $3–5 to order one of your own stickers before you list it for sale. Things look different on a screen than they do in your hand.
Step 4: Choose Your Production Method
This part can be very overwhelming for many beginners, so we’re going to do our best to break it down as clearly as we can by going over the three main methods you can use to produce your stickers.
1. Make Them Yourself

If you have enough capital to work with, you can opt to buy your own printer and cutting machine to make stickers from home.
Most sticker printers cost anywhere from $200 to $2,000, depending on whether you want an entry-level desktop inkjet or a super-tank printer like the Epson EcoTank series.
The only problem with this method is that you’re now fully invested in making your stickers yourself, so you’ll have to be confident in which designs will sell before you've sold any.
2. Bulk Order from a Manufacturer

Find a print shop like Sticker Mule or StickerGiant that can produce multiple units (usually bulk orders of 500 or 1,000) of your sticker design and have them shipped directly to you.
Per-unit cost is the lowest among these methods, often under $1 per sticker at volume.
However, the drawback is that you're now sitting on inventory and you've committed cash upfront, so much like the first method, you have to guess which designs will sell before you've sold any.
3. Print-on-Demand

For most creators starting out, print-on-demand is the go-to option.
That’s because the math actually works. Not to mention there’s zero risk, and you can launch a 30-sticker line in a weekend without ordering anything.
This is the model Fourthwall is built around. You can design custom stickers starting at $2.29, with no minimum order or monthly fees, and the platform handles printing, packing, and shipping for you.
With Fourthwall, you can set your own prices, and the production cost is automatically deducted from each sale. It’s the one scenario where bulk ordering wins: if you're already moving high volume and the per-unit savings outweigh the operational overhead of running your own fulfillment.
The DIY Path: Making Your Own Stickers at Home
If you do decide to make stickers yourself, you should have a better understanding of how the process works.
Plenty of successful sticker creators started making stickers themselves before making the switch to print-on-demand once their volume grew. Others choose to stick with the DIY path because they love making physical things by hand.
So before you jump into production, here's everything you actually need to know to make stickers at home.
Choose Your DIY Method
To start, decide which method you would like to go with. When it comes to DIY, you can create your stickers digitally or, if you want more authenticity in your designs, make them by hand.
- Print-and-Cut with a Home Machine: You design your sticker digitally, print it on sticker paper using a home inkjet printer, then use a cutting machine to cut around the shape. This is the most common DIY approach and the one that scales the farthest (relatively speaking). Almost every Etsy sticker shop you've seen runs on a setup like this.
- Hand-Drawn & Manual Cutting: This works best for one-of-one art stickers or very small batches. Draw your design directly on the sticker paper (or print a digital design and embellish by hand), then cut it out with scissors or an X-Acto knife. It’s a much slower method, but you’re not investing in equipment beyond pens and paper.
Product List: What You Need to Buy
Here's a realistic shopping list of the tools and products you need to make stickers at home. These prices are approximate and based on 2026 retail:
- An Inkjet Printer ($150–$700): You’ll want an inkjet, not a laser printer, since laser toner doesn't bond well to vinyl. The two most recommended printers for sticker makers are the Canon PIXMA TS9520 (currently $250, prints up to 11x17) and the Epson EcoTank series (around $330–$700, with refillable ink tanks that dramatically reduce cost-per-sticker over time).
- A Cutting Machine ($200–$500): Two main brands that most DIY makers are using are the Cricut Maker 3 (on Amazon for $427.51), which has great software and a huge community of tutorials on YouTube, and the Silhouette Cameo 5a ($270), which is slightly more affordable and more flexible for advanced users.
- Sticker Paper or Vinyl ($15–$40 per pack): This is where quality really matters. The basics here consist of Matte, Glossy, Holographic, or Waterproof Vinyl, depending on whether you’re looking for detail, color, or a more premium look in your designs. Many brands recommend Koala, Online Labels, HTVRONT, and Cricut's own vinyl line. Expect to pay $15–$25 for a pack of 25–50 sheets.
- Laminated Sheets ($15–$30 per pack). Critical for waterproofing if your sticker paper isn't already pre-laminated. Cold laminate sheets are easier to work with than thermal, since there’s no heat machine needed, and all you need to do is peel and press. It’s what separates a sticker that survives a dishwasher cycle from one that peels after a week.
- Design Software: You don't really need to spend anything here. Free tools like Canva, Inkscape, or Cricut Design Space will all get the job done. If you have an iPad, Procreate ($13 one-time) is the gold standard for hand-illustrated stickers.
- Packaging Supplies ($20–$40 to start): Cardboard mailers or rigid envelopes ($0.30–$0.80 each in small quantities), poly bags to protect stickers from moisture in transit, a thank-you card or insert if you want to add a personal touch, and shipping labels (just print on paper and tape, or buy a Rollo label printer for $200 once volume picks up).
- Total Starter Budget ($500-1,200): Ultimately, your budget depends on the quality of the tools and consumables you use, with your printer and cutting machine accounting for the majority of it. Just know, you don’t have to spend a lot right away to get started. See what works within your budget and, over time, scale your production as your sticker business grows.
Understanding the DIY Process: A Step-by-Guide

Once you have the equipment, you’ll need to create a workflow that best suits you. Here’s what that process should look like:
- Design Your Sticker. Create or import your design into your design software. Set the canvas to your final sticker size (most home stickers are 2"–4" in size). Make sure your design has a transparent background if you're saving as a PNG, and add a small bleed area around the edge (about 1/8") so the cut line doesn't slice through any important details.
- Print Out a Test Sheet: Always print on regular paper first to check the colors and sizing before you commit a sheet of $1 vinyl. Inkjet printer colors look different on vinyl than they do on screen.
- Print on Sticker Paper: Once your test looks right, load the sticker paper into your printer (matte side down for most papers; check your specific brand's instructions). Print and let the ink dry fully for at least 10–15 minutes for matte, longer for glossy. Make sure your stickers don’t come out smudged.
- Laminate (optional but recommended): If your sticker paper isn't pre-laminated and you want waterproof stickers, apply a cold laminate sheet now. Peel the laminate backing, lay it gently over your printed sheet, and use a credit card or squeegee to press out any air bubbles from the center outward.
- Load Into Your Cutting Machine: In Cricut Design Space or Silhouette Studio, you'll import your design file (a PNG with a transparent background works best). The software auto-detects the outline and creates a cut path. For kiss-cut, set the blade depth to cut the vinyl layer but not all the way through the backing. For die-cut, cut all the way through.
- Cut Out Your Stickers: Place the printed sheet on the machine's cutting mat, send it through, and let the machine do its thing. A sheet of 25 small stickers typically takes 2–5 minutes to cut.
- Do a Weed and Peel Test: "Weeding" means removing the excess vinyl around your designs, leaving only the stickers. For kiss-cut, you'll lift away the negative space between stickers; for die-cut, you'll peel each finished sticker off the backing. Always do a peel test on one sticker to make sure your cut depth is right before processing the whole batch.
- Package and Ship: For single stickers, a cardboard mailer with a piece of cardstock backing keeps them flat. For multi-sticker orders, a poly bag inside a rigid mailer prevents bending. Add your shipping label, and you're done.
A practiced sticker maker can run through 25–50 stickers in about an hour once they have the system down. The first time will take much longer (probably 3–4 hours), including all the setup, troubleshooting, and ruined first attempts. Don’t worry, that's normal.
How Much Does One DIY Sticker Cost?
Let's do the real math here. Say you've bought a $400 printer and a $400 cutting machine ($800 in equipment), and you're making 3" kiss-cut stickers.
Per-Sticker Variable Cost (just materials):
- Sticker Paper: $0.20 (a $20 pack of 50 sheets yields about 25 stickers per sheet at 3" = $0.02 per sticker, but most home setups waste material on layout)
- Ink: $0.10–$0.40, depending on your printer and how much ink the design uses
- Laminate (if using): $0.15
- Packaging (mailer + label): $0.50–$1.00
Variable Cost Per Sticker: Roughly $0.95–$1.75, including packaging.
That's significantly cheaper than the $ 2.29-per-unit cost on a print-on-demand platform, if you ignore your time and the $800 upfront equipment investment.
Once you spread the equipment cost across your first 500 stickers, you're adding about $1.60 per sticker in equipment amortization. Now you're at $2.55–$3.35 per sticker, plus the value of your time.
The Reality of DIY vs. Print-on-Demand
Making stickers yourself usually becomes more profitable once you’ve built an efficient system and are consistently handling higher-order volumes.
Sure, there’s a lot of creative freedom that comes with it, but the reality is you need to be 100% dedicated, or else you’re investing all your time and money into nothing.
Print-on-demand, on the other hand, is better for saving time, avoiding upfront costs, and scaling more easily since you don’t have to manage production, inventory, or shipping as your sales grow.
So if you’re really dedicated to making handcrafted stickers at home, go the DIY route. But, if you want something that’s lower-risk and easier to manage long-term, print-on-demand gives you the freedom to grow your sticker brand without constantly having to pack orders and manage inventory.
Step 5: Setting Up Your Sticker Shop

Once you’re happy with your designs and know how you’re going to produce them, it's time to start selling.
If you don’t already, you’ll need to build an online shop using an online marketplace, social commerce, or an ecommerce storefront.
Understanding where your audience spends time online and how they prefer to shop can help you choose the right platform for growing your sticker business.
Marketplaces
Online marketplaces like Etsy, Amazon, and Redbubble do a great job of getting you in front of buyers who are already shopping.
The trade-off is fees (Etsy clips 10% all-in), high competition in broad searches, and almost no control over branding. Etsy is still the dominant marketplace for stickers and the easiest place to test demand.
Social Commerce Platforms
TikTok Shop and Instagram Shop are increasingly viable for stickers specifically, because the product is visual, cheap, and impulse-friendly.
If you're already creating content on these platforms, plugging directly into their shop is a fast path to your first sales.
Your Own Storefront
Building your own storefront gives you full control over branding, pricing, bundles, and customer relationships.
You do lose marketplace traffic (since you have to drive your own), but the margins and brand equity are yours to keep.
This is where ecommerce platforms like Fourthwall fit in. You can build a customizable storefront tailored to your brand for free, with no monthly fees. You only pay the per-unit production cost on what you actually sell.
Shopify is the other big option here, but it runs $39/month before you've made a single sale, and you still have to plug in a separate fulfillment tool.
One Thing Most Guides Skip: The Operational Stuff
If you're selling stickers as a business, you eventually have to deal with sales tax, customer support emails, refund requests, shipping address changes, and payment processing fraud.
These things aren't fun, and they get worse the more you sell.
This is where the platform you choose actually starts to matter. If you sell on Shopify or run your own site, you're responsible for figuring out sales tax registration in every state where you cross the threshold (Wayfair v. South Dakota changed the rules in 2018, so you can now owe tax in states you've never been to).
On Fourthwall, the platform acts as the Merchant of Record, which means it handles sales tax registration and remittance worldwide, including the messy multi-state stuff, not to mention their support team handles order questions, address changes, and refund requests with a 24-hour average reply time, including weekends.
That's worth flagging not as a sales pitch but as a real practical decision. Because if you're a solo creator, the operational tax of running this stuff yourself is the thing most likely to make you quit.
Step 6: How to Price Your Stickers Right

Now, this is where selling stickers gets interesting, because pricing is fundamentally different from that of other merch items.
The platform-wide average order on Fourthwall is $54. The average sticker price is $6. That's roughly a 9-to-1 gap.
If you’re only selling single stickers, your unit economics work against you—i.e., shipping costs eat into the margin, and customers never reach a meaningful basket size.
The goal isn’t to charge more per sticker. It’s to design your shop so customers buy more than one. Here are a few strategies that work:
- Bundle Stickers with Bigger Merch Items: A $6 sticker added to a $35 t-shirt order costs the customer almost nothing and raises your order value by 17%. The "checkout add-on" play is the single highest-leverage move in sticker pricing.
- Create Sticker “Theme Packs”: This is where the kiss-cut sheet product shines. Selling a 5-pack of stickers for $18 is better than selling five individual stickers for $5 each. They also feel more like a collectible item than a one-off purchase.
- Use Holographic as a Premium Tier: Same design, just on a more expensive material. The $13 holographic version doesn't have to outsell the $5 standard. It just has to exist as an option for customers who want it.
A Quick Note on Margins
On Fourthwall, you keep 100% of the markup between the production cost and whatever price you set.
There's no platform commission on physical products, just the per-unit cost and the standard payment processing fee (2.9% + $0.30, the same as Shopify).
So a kiss-cut sticker priced at $5 nets you roughly $2.55 after costs. Price it at $6, and you make $3.55 in profit. The point is you control the margin, and the math is transparent before you list anything.
Shipping Prices: The Math No One Talks About
Shipping can be the silent profit killer for any sticker business, which is why most guides avoid getting into it entirely.
Why? Because even the smallest increase in packaging, postage, or international shipping can quickly eat into your profits if you’re not planning your pricing and fulfillment carefully.
Here's what you should know to stay afloat:
USPS Letter Rates are Dramatically Cheaper than Package Rates
A single sticker in a plain envelope can ship for the price of a Forever stamp (around $0.78 as of 2026) if it stays under 1 oz and is flat. The moment it hits "non-machinable," you're paying $1.50+.
Mailers vs. Envelopes is a Real Decision Factor
A rigid mailer ($0.50–$1 each in bulk) prevents the sticker from getting bent in transit, but pushes you into package rates.
On the other hand, a regular envelope keeps you at letter rates, but you can end up getting "arrived bent" emails from your customers. There's truly no perfect answer, so pick the one that fits your customer's expectations.
Free Shipping is Psychological, Not Free
Offering “free shipping on orders over $25” is one of the easiest ways to get customers to buy more at checkout.
Even though shipping costs are usually built into your product pricing, people are far more likely to add an extra sticker or two to their cart if it means unlocking free shipping.
USPS and Pirate Ship are the two main options for handling your own shipping. Pirate Ship gives you commercial USPS rates without a monthly fee and is what most small Etsy sticker shops use.
If you're using a print-on-demand platform, shipping is handled for you. However, it's still worth understanding because rates pass through to your customer at checkout.
On Fourthwall, shipping rates are calculated for you, with most orders arriving in 5–8 days. The trade-off versus letter mail is faster, more reliable delivery in a real mailer, but a higher shipping price for the customer than a stamped envelope. Either way, it’s worth knowing.
Step 7: Promote Through Channels that Scale
At this point, you now have your sticker business up and running—congrats!
All that’s left is getting customers to your store. There are several ways you can go about this, all with their own benefits for driving traffic to your sticker’s page.
Organic Social Media
This is where almost every successful sticker brand is built.
Platforms like TikTok, Instagram, and Pinterest reward visual products with a strong design point of view, and stickers are tailor-made for the format.
Get creative with your content by posting behind-the-scenes videos of how your stickers are made or how they look on certain items like laptops or water bottles.
For more authentic marketing, ask your customers to record their unboxing experience once your stickers arrive. Showing real customer reactions will make your product look more exciting to potential buyers who are scrolling by.
Email Marketing

The classic stat is that email marketing returns roughly $36 for every $1 spent. It's not as flashy as social, but the math is unbeatable.
A simple way to grow your sticker business is to offer customers a small discount, such as 10% off, when they sign up for your newsletter.
You should also send emails when new sticker designs launch and follow up with past customers a month or two later to remind them about new designs and bundles.
Tools like Klaviyo, beehiiv, and Mailchimp are perfect for syncing up supporter emails, and they integrate natively with Fourthwall if you're using it as your storefront.
Or if you’re on Substack, use your newsletter to share behind-the-scenes updates, early sticker previews, polls, and exclusive discount codes to turn casual readers into repeat customers.
Product Page SEO

Incorporating searchable keywords into your product titles, descriptions, and blog content can improve your stickers' chances of ranking high in Google and marketplace search results.
For instance, if your niche is "anime stickers for Studio Ghibli fans," writing one good post about the visual themes of Spirited Away will pull customers for the next 36 months.
You can also boost your visibility by optimizing your product image’s alt text, using long-tail keywords, creating themed collection pages, and linking your products through social media captions.
Platform Integrations
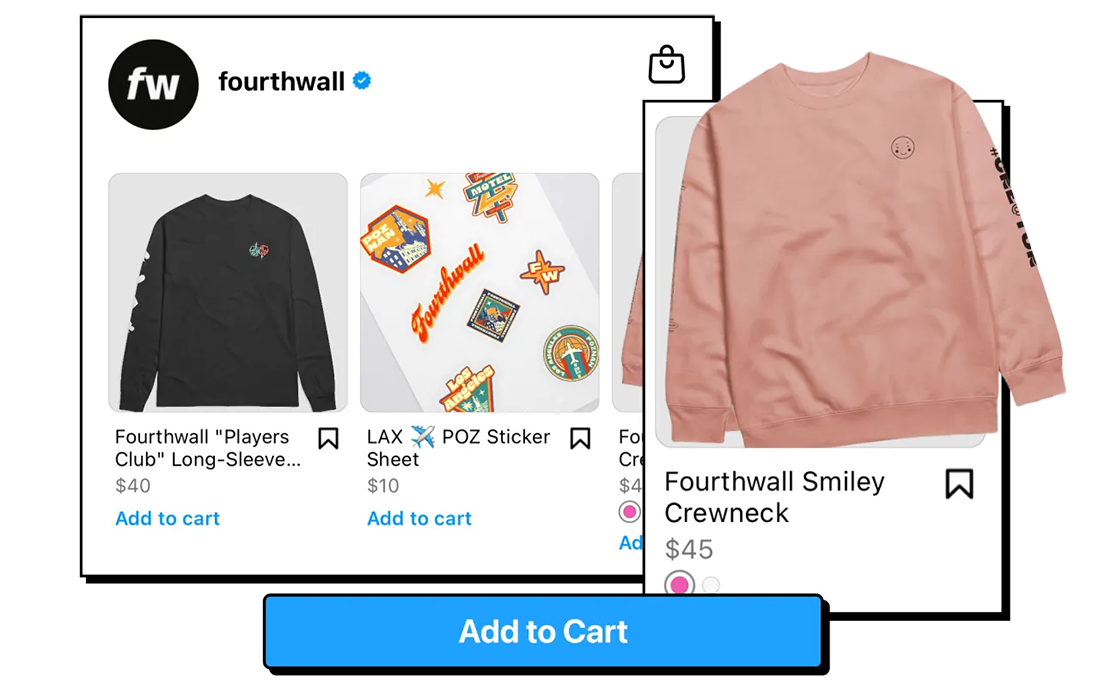
If you're on YouTube with 500+ subscribers and YPP-eligible, the YouTube Merch Shelf shows your stickers directly under your videos, so your viewers don't have to leave the platform to buy.
The same applies to TikTok Shop, Meta Shopping, and Twitch Product Gifting on stream. If you make content, your stickers should be one click away from where the content lives.
Paid Ads

Believe it or not, a lot of beginners lose money with ads because the numbers can get tricky fast.
Think about it: if your average sticker sale is only around $6, you usually need to spend less than $2 to acquire a customer for the business to stay profitable, which is difficult on platforms like Facebook, Instagram, or Google Ads.
Sure, they can work later on once you’ve figured out how to bundle products and consistently turn visitors into buyers, but for first-time sellers, they shouldn’t be the first marketing strategy to rely on.
Understanding the Big Picture
Sticker sales on Fourthwall are up roughly 66% year-over-year, with unit volume up about 68%.
The category is genuinely expanding. So, the question isn't whether there's demand—it's whether your shop is positioned to catch it.
Build the free channels first, then layer the paid ones on once you have a cushy margin to fund them. Remember, marketing your stickers takes just as much effort as making them does. Get creative and see what works.
Step 8: Scale Once You’ve Found What Works
A lot of creators make the mistake of trying to grow their business too fast before they even know which sticker designs people truly care about.
Printing tons of products and launching huge collections usually leads to wasted time, unsold inventory, and burnout.
The smart move is to start small. See what your audience responds to, then slowly build around the designs that are already selling. Here’s a much better approach:
Start with 5–10 Designs in a Similar Style
Don’t overwhelm yourself with 50 different sticker ideas right away.
A smaller launch helps you stay focused, makes your shop feel more cohesive, and gives you a clearer picture of which designs people actually connect with.
Give Your Designs Time to Breathe
Run your shop for at least 30–60 days and pay attention to what customers interact with the most.
Look at which stickers get purchased, shared on social media, added to carts, saved on Pinterest, or mentioned in comments and DMs.
Build Around Your Best Seller
If one sticker suddenly starts outperforming everything else, that’s a sign you found something people genuinely want.
Create different versions of it, such as larger sizes, alternate colors, holographic finishes, matching sticker packs, or spin-off designs with the same vibe.
Turn Sticker Buyers into Merch Buyers
Stickers are often the “entry product” that introduces people to your brand because they’re affordable and easy to impulse buy.
Once a design proves itself, try putting it on products like notebooks, hoodies, mugs, tote bags, or phone cases to increase your average order value and expand your store.
Invest Back into Better Designs
As your business starts making money, one of the smartest things you can do is improve the quality of your artwork and branding.
A $200 illustration that becomes your top-selling sticker for two years is the best ROI you can make for your sticker business.
First 30 Days: A Week-by-Week Launch Plan
Having a strategy is useless without the proper execution. Here's a literal four-week plan you can follow if you're starting from scratch.
Week 1: Foundation
Goal: Have a niche, 5 design concepts, and a domain claimed by the end of the week.
- Day 1–2: Pick your niche (use the prompts in Step 1) and write a one-sentence description of your customer.
- Day 3: Run the 48-hour validation playbook from earlier in this guide. Post sketches on three social media accounts and ask for your audience's opinion.
- Day 4–5: Sketch 5 design concepts. They don’t need to be polished, just rough versions to test which direction has legs.
- Day 6: Pick a shop name. Check that the .com or .store domain is available, and verify the Instagram and TikTok handles.
- Day 7: Rest day. (Seriously, taking a day off to clear your head really helps)
Week 2: Build
Goal: Finish your designs, set up your shop, and order samples.
- Day 8–11: Finalize your 5 sticker designs. Use the design checklist from earlier to help. Make sure all files are 300 DPI PNGs with transparent backgrounds.
- Day 12: Set up your shop. If you're using Fourthwall, the Getting Started Guide walks you through design setup, payment, and shop customization, which usually takes 60–90 minutes in total. If you're using Etsy, the listing process is faster, but you'll spend more time on photos and SEO.
- Day 13: Upload designs, write product descriptions, set prices. Make sure each sticker has at least 3 product photos or mockups.
- Day 14: Order a sample of each sticker. Spend the $15–25. It’s not that much, and you'll catch things you'd miss on screen.
Week 3: Launch
Goal: Get to your first 10 sales.
- Day 15–16: Your samples arrive. Take photos of them in real-life contexts (like on a laptop, a water bottle, a journal, a wall, etc.). These photos will outperform mockups in social posts.
- Day 17: Soft launch to your existing audience. You don't need to make a big event of it, just post the shop link on your stories and feed.
- Day 18–20: Post content daily, whether it’s showing the sticker-making process, how it looks in real life, or what it looks like on stuff. Use the hashtags your niche actually uses (find these by checking what successful accounts in your space tag).
- Day 21: Email everyone you know. Yes, individually. Friends and family are not your real customers, but their shares are how you reach real customers. Fourthwall's Launch Checklist is worth skimming for the operational details.
Week 4: Iterate
Goal: Understand what worked, what didn't, and plan the next batch.
- Day 22–24: Look at your data. Which designs sold? Which got engagement but no conversions? Which got nothing? Be honest and use that data to your advantage.
- Day 25–26: Reach out to your buyers. A handwritten thank-you note, a follow-up email, or (if you're on Fourthwall) a personalized Thank-You video can work tremendously. Creators who have sent thank-you videos on Fourthwall have reportedly seen a boost in repeat purchases by rates of 30% or more.
- Day 27–28: Plan your next 5 designs based on what sold. The winner gets variations. The loser gets replaced.
- Day 29: Set up email capture if you haven't. A simple "10% off your first order" pop-up on the storefront is the bare minimum.
- Day 30: Review the month honestly. Are you above zero in sales? Below? What surprised you? Decide whether to keep building or pivot.
If you’re starting completely from scratch with no audience and make over $200 in sales within your first 30 days, that’s a strong sign your sticker business has real potential.
And if you already have an existing audience on social media, YouTube, or email, earning anywhere from $500–$2,000 early on is a very realistic goal, depending on how engaged your followers are.
Your Sticker Toolkit Roundup
We’ve covered a lot of different tools and resources throughout this guide to help you start and grow your sticker business.
To make things easier (and avoid searching aimlessly through the article), we’ve compiled a list of all the essential tools in one place so you can quickly find everything you need.
Design Tools
- Canva: Free, easy, good for beginners, and type-led designs.
- Procreate: Paid iPad app, the standard for hand-drawn sticker illustration.
- Adobe Express: Free, web-based, integrates with the Adobe ecosystem.
- Figma: Free, vector-first, great for designers.
- Inkscape: A free open-source vector editor.
- Kittl: Paid AI design platform that’s increasingly popular with merch creators.
Find a Designer/Illustrator
- Fourthwall Design Community: Vetted network of designers who work with creators.
- Fiverr: A broad marketplace that is budget-friendly.
- Behance: Portfolios from established illustrators.
- Dribbble: Design talent, especially good for type-led work.
Research and Validation
- Google Trends: Tracks popular search terms so you can spot rising trends.
- eRank: Etsy keyword and competitor research.
- Marmalead: Etsy SEO and trend tracking.
Selling and Shipping
- Fourthwall: Free creator storefront with print on demand. Handles fulfillment, tax, and support.
- Shopify: Robust ecommerce storefront for $39/month. Requires a separate POD integration.
- Etsy: An online marketplace with built-in traffic.
- Pirate Ship: Discounted USPS rates for self-fulfilled shipping.
- Sticker Mule and StickerGiant: Manufacturers for bulk sticker printing if you're going the inventory route.
Email and Marketing
- Klaviyo: Best-in-class for ecommerce email automation.
- Mailchimp: Send newsletters and automated emails to grow your business.
- Beehiiv: Offers tools for designing professional newsletters.
- Substack: Subscription newseltters for monthly updates and product info.
- Later or Buffer: Schedule social posts in advance.
Why So Many Sticker Creators Are Choosing Fourthwall
Starting a sticker business might seem intimidating at first, but if the data has proven anything, it's that there’s a real opportunity for small creators to make a profit.
Over 168,000 stickers were sold through Fourthwall in the last year alone, with sticker sales growing 66% year over year.
Even more interesting, around 70% of those sales came from the platform’s smallest shops, which are usually solo creators running everything themselves, while another 26% came from slightly larger small businesses still operated by one person or a very small team.
That means nearly all sticker revenue on the platform is coming from independent creators, not giant brands with huge teams or a massive following at their side.
Remember, the most successful sticker creators are often the ones who stay consistent, understand their niche, and continually improve their designs over time.
FAQ
Sticker businesses are profitable at volume rather than premium pricing, with the average sticker priced around $6 and platform-wide average order value at $54 across Fourthwall sticker shops. The creators earning full-time income are the ones bundling multiple stickers per order or pairing sticker sheets with larger merch like t-shirts and totes. Print-on-demand stickers on Fourthwall carry 40-55% margins, so a profitable shop needs to move volume, not chase high per-unit prices.
A print-on-demand sticker business costs effectively zero to start on Fourthwall since production only happens after a customer places an order and there is no monthly platform fee. Optional spend includes design work (Canva is free, freelance illustrators charge $50 to $200 per design), a custom domain around $12 per year, and early promotion. Handmade sticker businesses typically need $500 to $1,500 upfront for a printer, cutting machine, vinyl stock, and packaging.
Kiss-cut stickers are the best entry point for a new sticker business because they cost the least to produce, are the easiest to design for, and account for roughly 65% of all sticker units sold on Fourthwall. Once a design proves out, sellers commonly add holographic versions that sell at more than double the per-unit price and package themed sheets as a bundling play. Die-cut and vinyl decals come later once the shop has a signature aesthetic.
Original sticker designs are automatically protected by US copyright as soon as they are created in a fixed form, and formal registration through the US Copyright Office costs $45 and adds enforceable damages in infringement cases. Trademarking a brand name or logo is separate and costs $250 to $350 per class through the USPTO. Sellers using fan-art or celebrity likenesses without licensing risk takedowns and lawsuits, since parody defenses rarely hold up for commercial merchandise.
Most new sticker businesses fail because founders design what they personally like instead of what their niche audience is actively searching for, then run out of runway before finding product-market fit. Underpricing to compete with $1 marketplace stickers is the second common killer, since shipping and material costs alone often exceed the sale price. Successful sticker sellers pick a specific community, price for 60-plus percent margins, and treat social content as the main sales channel.
Matt Keyser is a writer at Fourthwall who lives at the intersection of social media and Creator culture. With 4+ years of experience covering industry trends, his work focuses on helping Creators and brands understand how to turn their passion into a thriving business while maintaining a constant pulse on the latest eCommerce and social media trends.


You might also like

How Much Does TikTok Pay in 2026? A Detailed Breakdown

How to Make Money as a Content Creator the Smart Way

25 Best Ways to Make Money With Your Phone for Beginners

How Many Views Is Viral in 2026? Benchmarks by Platform

15 Best Ways to Make Money as a College Student

10 TikTok Live Ideas to Engage Your Audience in 2026

How to Grow Social Media Followers: 8 Proven Methods for Creators

How to Start a Swimwear Line in 2026: A Step-by-Step Guide

How to Start a Clothing Line: A Complete 2026 Guide

Keep up with the latest from Fourthwall
New features, product updates, trend breakdowns, and creator stories — straight to your inbox.