T-Shirt Logo Design Placement Guide w/ Size Chart
Designing your first custom t-shirt feels exciting…until you open the mockup editor and realize you have no idea where anything is supposed to go.
Do you slap your logo in the center? Keep it subtle on the chest? Go oversized and bold?
If you’re launching merch for the first time, those details matter more than you think.
In this guide, we'll break down the smartest logo and shirt-print placements, when to use them, and how to make your design look intentional rather than accidental.
Though this article will primarily focus on t-shirts, the same principles apply to hoodies, long sleeves, crop tops, polos, and just about any custom apparel you plan to drop.
Let’s make sure your first design does not look like your first design.
Print Design Terms You Should Know
If you’re serious about selling custom tees, you can’t just “eyeball it” and hope for the best.
Understanding proper print terminology helps you avoid crooked graphics, awkward sizing, and returns that tank your brand rep.

Here’s the vocabulary that separates polished drops from rookie mistakes.
- Print Size: The exact measurement of your artwork on the garment. Not the canvas size, nor the mockup preview. The real, physical dimensions.
- Print Area: The total space available on the garment where your design can live. Seams, collars, pockets, and fabric type all affect this. Just because your file is huge doesn’t mean the shirt can handle it.
- Print Location: The category of where your design appears: left chest, full front, sleeve, full back, etc. Think of this as the “zone” on the garment.
- Print Placement: This is the exact positioning within that zone. Two inches higher? Slightly off-center for a streetwear vibe? Placement makes the difference between intentional design and asking yourself, “Why does that look weird?”
- Standard Size: The common size range most providers default to for each print location. It’s the safe starting point and usually works across most adult sizes.
- Maximum Size: The largest possible dimensions you can print without sacrificing quality. This depends on garment size, fabric type, printing method, and artwork resolution. Push past this, and quality drops fast.
- Oversize: Anything bigger than standard but still within the allowed max range. Oversized prints are popular for streetwear and statement pieces — just make sure your file resolution can actually support it.
- Anchor Point: The reference point from which all measurements are calculated. This matters most for asymmetrical designs. It ensures your artwork aligns correctly, preventing it from drifting off-center during production.
Types of Printing
Not all printing methods deliver the same results. Whichever option you choose will greatly affect your design’s color, detail, texture, and longevity.
Fourthwall offers several printing options for every t-shirt designer. Each is suited for different fabrics, artwork styles, and creative goals, so you can choose the method that best brings your vision to life.
- DTFx (Direct-to-Film): Perfect for bold, vibrant graphics on heavyweight or premium garments. It handles high color saturation extremely well and delivers strong durability.
- DTG (Direct-to-Garment): Best for breathable fabrics and highly detailed artwork. If your design includes gradients, subtle shading, or photorealistic elements, DTG is usually the move.
- HTV (Heat Transfer Vinyl): Ideal for custom names, numbers, specialty finishes, and textured effects. Great for personalization and small-batch customization.
- Sublimation Printing: Delivers ultra-vibrant, long-lasting prints that won’t crack or peel. It works best on polyester or performance fabrics where the ink bonds directly into the fibers.
Transfer Placement & T-Shirt Design Size Chart

Front of Shirt Logo & Design Placements
The front of your shirt is considered prime real estate since it’s the first thing people see.
But not all front placements hit the same. A subtle left chest logo sends a completely different message than a bold, oversized center graphic.
Below, we’ll break down the most popular front-of-shirt logo and design placements, what they’re typically used for, and how each one shapes the overall vibe of your tee.
1. Center Chest Design Placement

When placing a centered design on the front of a shirt, the placement, size, and level of design detail are crucial. This is not ideal for tops with any sort of placket.
If you’re interested in displaying artwork on the front of your clothing item, here are some things to keep in mind:
- Design Type: This placement is ideal for medium-sized designs, such as logos, text, or simple artwork. Use simple, high-quality design elements that are easy on the eyes but don’t go unnoticed.
- Placement: Make sure your designs aren’t too high, too low, or uncentered on your shirt. This is why we suggest placing your design around 2.5-3 inches (6-7 centimeters) below the neckline.
- Print Size: Choose a size for your design that allows for easy visibility and doesn’t look awkward. We suggest making your design 6-10 inches wide and 6-8 inches tall. At the end of the day, I think this is subjective/personal preference and really depends on the design used, but I agree that 6”-10” wide is a pretty “standard” size.
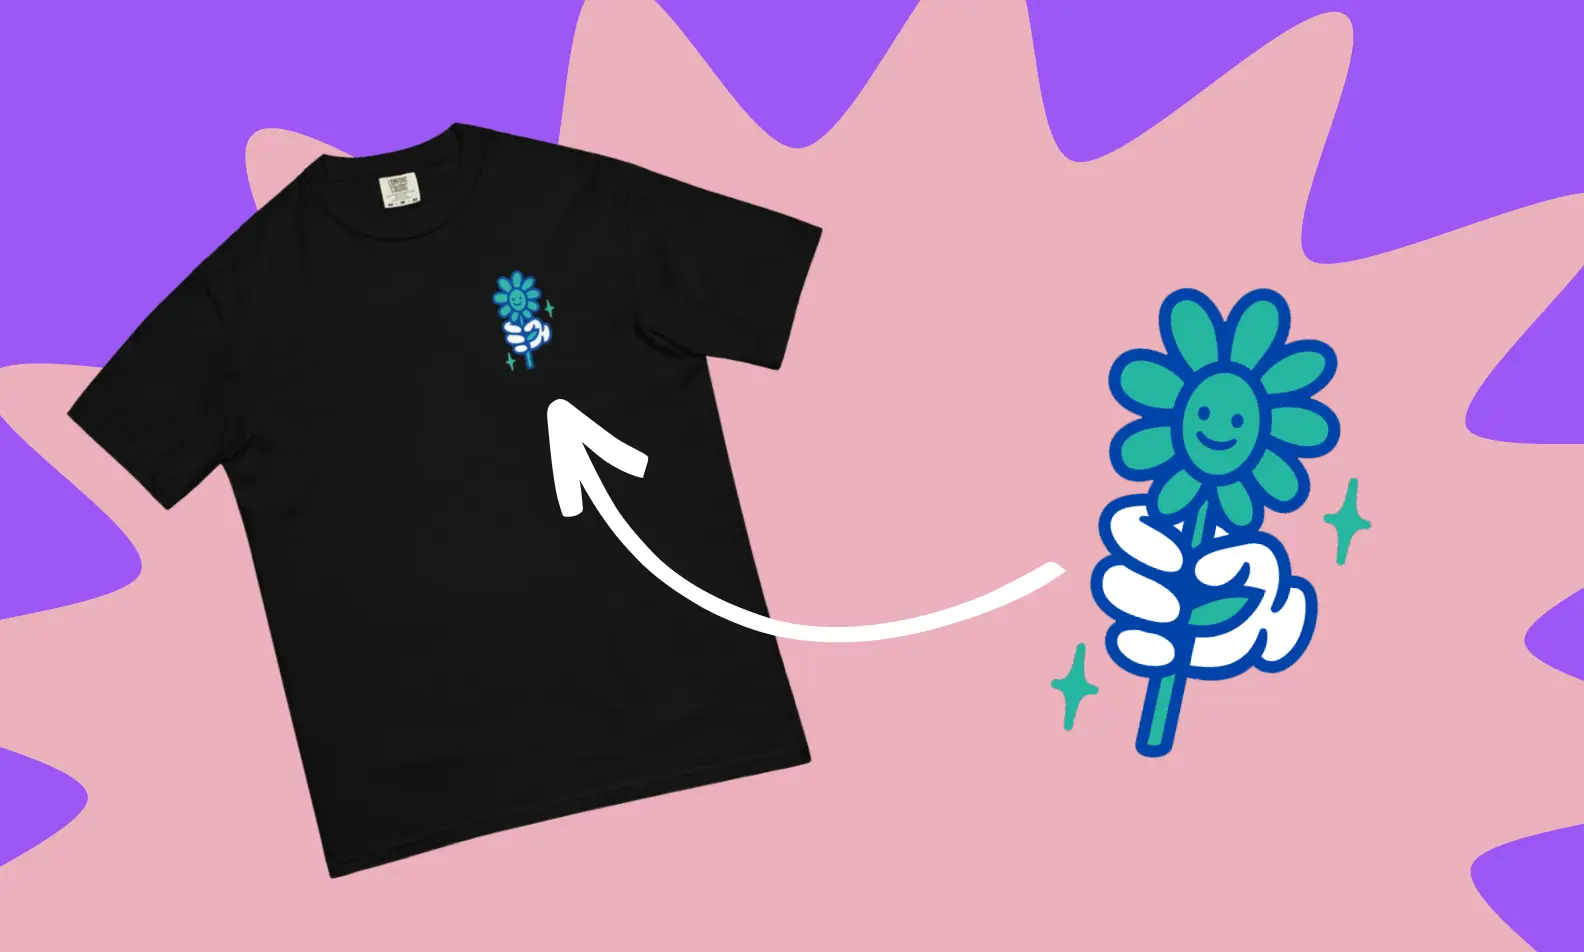
2. Left Chest Logo & Design Placement

This placement is used by all kinds of brands to display their logos. You can even get fancy and incorporate embroidery, which is a solid option for creators who want a more premium look. Here are some things to keep in mind if you’re interested in this placement:
- Design Type: Similar to the center chest placement, this placement is better for small designs, such as logos. Small artwork and short text can work well for this placement, but logos are definitely the best option. Popular brands such as American Eagle or Hollister are known for displaying their logos on the left chest of their tops.
- Placement: We suggest placing your design about 3 inches (7cm) below the neckline and 2 inches (about 5cm) away from the armpit to avoid an awkward look.
- Print Size: We suggest making this design smaller, 2.5-5 inches (6-12cm) wide and 2.5-5 inches (6-12cm) tall.
3. Full Front Logo & Design Placement

Full-front design placements will occupy the majority of the print area on the front of your shirt. Here are some things to keep in mind:
- Design Type: The full front placement is best for super-complex or bold designs. These designs can be more detailed, since there’s much more room for them, and they’ll be easier to see. Be sure that the file you upload is of high quality to avoid blurriness in the final print.
- Placement: In most cases, with this placement, you’ll use the entire print area for your design. We recommend being extra careful to ensure it’s placed directly in the center of your product, not too close to the collar or the bottom of the shirt.
- Print Size: We suggest making this design much larger, 10-12 inches (25-31cm) wide and 10-14 inches (25-35cm) tall. The design should be appropriately sized to ensure the full-front placement is visible from all angles without extending beyond the print area.
4. Oversized Front Logo & Design Placement

If you’re trying to make a statement instead of just “adding a logo,” this is the placement.
The oversized front pushes beyond the traditional full-front print, creating that bold, streetwear-inspired look that immediately commands attention. Here’s what to keep in mind:
- Design Type: This placement works best for large graphics, detailed illustrations, big typography, or statement artwork that needs room to breathe. Minimal logos usually feel underwhelming here, so go bold or don’t go oversized.
- Placement: Keep the design centered and balanced on the torso. Oversized prints can extend beyond the standard full-front design and may slightly wrap toward the sides. But be careful, too much wrapping can distort the artwork and throw off the look.
- Print Size: For adult tees, aim for approximately 13–15 inches (33–38 cm) wide, scaling proportionally for different garment sizes. Remember to always double-check your file resolution before committing, as bigger prints demand higher-quality artwork to avoid pixelation or dull results.
Back of Shirt Logo & Design Placements
If the front grabs attention, then the back seals the deal.
Putting your design or logo on the back of a shirt gives you the space to go bigger, louder, and more intentional with your brand.
It’s a great way to turn your tee into a walking billboard that people will turn around for.
1. Back Collar Design Placement

If oversized graphics are the loud statement, the back collar placement is the quiet flex.
It’s perfect for adding branding without overpowering the overall design. Think of it as the signature at the bottom of a masterpiece. Here’s what to know:
- Design Type: This placement works best for small logos, icons, monograms, initials, or simple brand marks. It’s not meant for detailed artwork or long text.
- Placement: Center the design directly below the neckline, about 1 inch (2.5 cm) beneath the collar seam. Keeping it aligned and close to the collar maintains balance and ensures it looks intentional rather than misplaced.
- Print Size: Aim for approximately 2–3 inches (5–7.5 cm) wide. Anything larger can look awkward and distract from the shirt’s overall aesthetic.
2. Upper Back Design Placement

The back of a t-shirt provides ample space to showcase a design or message. Here are some things to keep in mind if this is the placement you’re going with:
- Design Type: This placement generally calls for a medium-sized design, similar to the center chest placement. Logos, small artwork, or short text would work best for this placement. Consider using a design that’s wider and shorter, to take up more of the top back surface area.
- Placement: We suggest placing your design about 5 inches below the neckline.
- Print Size: We suggest making this design longer, 10-12 inches (25-31cm) wide and 1-6 inches (2.5-15cm) tall.
3. Full Back Logo & Design Placement

If you want your shirt print to do the talking, the full back placement is where you let it speak loud and clear.
This is prime space for bold graphics, detailed artwork, or a blown-up version of your logo that deserves the spotlight. Before you hit print, here’s what to keep in mind:
- Design Type: Full-back placement works best for larger, high-impact designs. Intricate illustrations, layered graphics, tour-style layouts, or expanded logo treatments thrive here. Just make sure your artwork is built at high resolution, especially if you’re preparing it using a print template or applying it with transfer paper, because larger prints expose flaws quickly.
- Placement: You’ll typically use most (if not all) of the back print area. Always center your design carefully using the collar and shoulder seams as your guide. A solid template can help ensure your design's alignment stays consistent across different shirt sizes and avoids that awkward “why is this slightly crooked?” moment.
- Print Size: Aim for approximately 10–12 inches (25–31 cm) wide and 6–15 inches (15–38 cm) tall, depending on the garment size and design proportions.
4. Oversized Logo & Design Placement

This is the same general size range as an oversized front print, but instead of hitting people head-on, it creates that dramatic “walk-away” moment.
It gives you the freedom to fill the entire back with bold branding or artistic designs that demand attention.
- Design Type: Oversized back prints are perfect for large illustrations, tour-style graphics, layered typography, detailed artwork, or expanded logo designs.
- Placement: Center the design using the collar and shoulder seams as your alignment anchors. Because the artwork covers a large portion of the back panel, balance is everything. The design can extend wide across the shoulder blades and lower toward the mid-back, but it should still feel structured rather than chaotic.
- Print Size: Like the oversized front, aim for approximately 13–15 inches (33–38 cm) wide on adult tees, scaling proportionally by size. High-resolution files are non-negotiable here, as bigger prints require sharper artwork to maintain design quality across the entire shirt.
5. Sleeve Logo & Design Placement

The sleeve is a great place to print a simple logo or design that complements the primary design on the front or back of the shirt. It's also a great place for any embroidery designs.
Just keep in mind that the sleeve area is more limited in terms of space, so it's important to keep designs simple and clean.
If you're considering adding a design to a shirt's sleeves, here are a few tips to consider:
- Design Type: Small logos or tiny branding assets are perfect for sleeve designs. Choose something that’s small and simple, since there’s not much room for it to be displayed.
- Placement: Placement on the sleeve can vary, but it's typically best to print towards the top or middle area of the sleeve for maximum visibility. Try to avoid placing your design too close to the shirt's armpit or any seams.
- Print Size: Sizing is really key for this placement. Don't make your sleeve design too large - it should be proportional to the size of the shirt and other design elements. An ideal size is around 4 inches (10cm) wide and 3.5 inches (9cm) tall.
All Over Print Placement

If a standard shirt print isn’t enough and you want your design to completely take over the garment, all-over print is the move.
Here, your artwork isn’t confined to a small print area. Instead, it covers the entire shirt from edge to edge, sometimes even running seam-to-seam for maximum impact.
It’s bold, immersive, and built for brands that don’t do subtle.
- Design Type: All-over prints are perfect for repeating patterns, large illustrations, gradients, textures, or layered artwork that wraps across the entire garment. Because the design is printed on fabric panels before the shirt is cut and sewn, you can achieve true edge-to-edge coverage without awkward blank spaces.
- Placement: With seam-to-seam placement, your design flows across the front, back, and sometimes sleeves. That means you need to be mindful of how elements line up at the shoulders and side seams. A well-built template will show safe zones and bleed areas so important design details don’t get chopped off during production.
- Print Size & File Setup: Unlike standard placements with fixed dimensions, all-over prints require full garment-sized artwork at high resolution. Larger canvas sizes and precise file formatting are essential to maintain clarity and color vibrancy across the entire shirt. If done right, the result feels custom, premium, and impossible to ignore.
Label Placements for Branding
For any designer trying to build a real brand, having a custom label on your shirt makes all the difference.
They’re small, but they instantly elevate your shirt print from “custom tee” to “legit apparel brand.”
Inside and outside labels reinforce your identity, add professionalism, and keep your name visible long after someone checks out.
Let’s break down both options.
Inside Labels

Inside labels sit just below the back collar on the shirt's interior. They replace or print over the manufacturer’s tag (when removable), giving you prime branding space that customers see every time they put the shirt on.
- Why It Matters: An inside label helps build brand recognition, living right at the neckline and making it impossible to ignore. It’s one of the easiest ways to make your merch feel retail-ready.
- Design Specs: Most inside label print areas max out at around 3" × 3", though some garments may allow slightly smaller dimensions, like 2 "× 2" or 2.5 "× 2.5". Your actual logo placement area is often closer to 3" x 1.13", so keep your design compact and clean.
Outside Labels

Outside labels are placed on the exterior of the garment. Most commonly near the bottom hem on the back, though exact placement can vary by product.
It's the kind of visible branding that can add a subtle premium touch to any shirt.
- Why It Matters: An outside label signals confidence. It’s minimal, but it tells customers, “This is branded, and it’s intentional.” It’s especially popular for streetwear-style drops and higher-end merch collections.
- Design Specs: Standard outside label areas are typically 3" x 3". Because the space is small, avoid intricate details or complex graphics.
Adjusting Design Placement by T-Shirt Size
One of the fastest ways to make a shirt look “off” is to use the exact same shirt-print dimensions across all sizes.
For example, a 12-inch-wide graphic might look perfect on a medium, but throw that same file onto a small or 3XL, and suddenly the proportions feel awkward.
Overall, scaling your placement by size keeps your design looking intentional across all body types.
Small & Extra Small
Slightly reduce the width and height of your design (usually by 1–2 inches compared to a medium). Keep the placement balanced so it doesn’t overwhelm the chest area.
Medium (Your Baseline)
Treat the medium as your reference template. This is typically where standard placement sizes (like 10–12 inches wide for full front or back prints) are designed to look most balanced.
Large & XL
Increase the design width proportionally so it fills the print area naturally. Avoid simply stretching the file by scaling it evenly to maintain resolution and spacing.
2XL & Above
Consider increasing the print size beyond standard dimensions if your provider allows it. Larger garments have wider print areas, and failing to scale up can make bold graphics look undersized.
Which Placement Works Best for Your Design
Where you place your design can make or break the entire look of your shirt.
The exact same logo, graphic, or phrase can feel clean and premium in one spot or awkward and off-balance in another.
If you want your custom shirt to look polished and intentional, you need to align your placement with your design style and printing method, whether that involves screen printing, DTG printing, or heat pressing.
Let’s break it down.
Logos

If you’re building a business or trying to grow a recognizable logo brand, placement is everything.
- Best Placements: Left chest, back collar, small upper back, or subtle hem/outside label.
- Why it Matters: Logos are about brand repetition and recognition. Smaller placements feel premium and retail-ready, especially when paired with embroidery or a clean DTG printer finish.
- Pro Tip: Keep your logo size proportional to the shirt type. A tiny logo on an oversized tee can look lost, while an oversized logo on a slim-fit shirt can feel overwhelming.
Artwork

If your design centers around an image, illustration, or layered graphic, you’ll want room to let it breathe.
- Best Placements: Full front, oversized front, full back, or all-over print.
- Why it Matters: Detailed artwork benefits from larger print areas, especially when using DTG print methods that preserve gradients, shading, and color transitions in the ink.
- Production Tip: For vibrant designs on heavyweight fabric, screen print can create bold, long-lasting results. For highly detailed pieces, a DTG printer may give you better precision.
Text-Based Designs

Text-only or typography-focused designs rely heavily on placement for impact.
- Best Placements: Center chest, oversized front, or full back for bold statements; left chest for subtle messaging.
- Why it Matters: Words need balance. A short phrase can work perfectly as a clean center shirt print, while longer quotes often look better enlarged across the back.
- Production Tip: Crisp lettering pairs well with heat-press transfers, transfer paper, or screen printing, depending on your volume and finish preference. Make sure fonts are legible and properly scaled across different shirt sizes.
Common Logo & Design Placement Combinations
Of course, you can mess around with designs and combine whatever placements make the most sense to you, but there are a few combinations that are commonly used by brands:
- Small logos or designs can complement the primary design on any part of the front or back of the shirt.
- Full back design placements are popularly combined with center or left chest placement designs and logos.
- Upper back design placements are commonly combined with left chest placement designs and logos.

Try out different combinations of design placements to see what looks best.
These are just suggestions, but you can always push the boundaries and have fun trying out different looks.
Start Designing Your Shirts with Fourthwall

Great design has never been about playing it safe. It is about experimenting, refining, and finding the placement that makes your shirt hit exactly the way you imagined.
The guidelines above give you a strong starting point, but the final call is yours. Every measurement depends on your design, your audience, and the overall vibe you want your shirt to deliver.
With Fourthwall, you get the tools to design, produce, and sell high-quality custom shirts without the headaches of production.
If you are ready to stop sketching ideas in your notes app and start turning them into real products people can wear, this is your moment. Launch your brand and make it official.
FAQ: T-Shirt Design Placement
What is the best placement for a logo on a shirt?
The most popular logo placement is the left chest because it feels clean, professional, and retail-ready. If you want something more subtle, the back collar works well.
If you want your shirt to have a more bold branding, a full front or full back shirt print can help make a stronger visual impact.
What size should a logo be on a t-shirt?
Your logo size depends on the placement and shirt type.
A left chest logo is typically 2.5 to 5 inches wide, while a full front or back print usually measures 10 to 12 inches wide.
Remember to scale proportionally by garment size in order to maintain visual balance.
What is the difference between print placement and print area?
Print placement refers to the exact position of your design on the garment, such as on the left chest or across the full back, while print area is the total printable space available on that section of the shirt.
Understanding both helps ensure your shirt design looks intentional rather than awkwardly spaced.
Which printing method is best for custom shirts?
It depends on your design and fabric.
DTG print works best for detailed artwork and color gradients, while screen print is ideal for bold graphics and bulk orders.
Heat press and transfer paper methods are also great for personalization and specialty finishes.

Matt Keyser is a writer at Fourthwall who lives at the intersection of social media and Creator culture. With 4+ years of experience covering industry trends, his work focuses on helping Creators and brands understand how to turn their passion into a thriving business while maintaining a constant pulse on the latest eCommerce and social media trends.